How to mail merge double-sided tent cards in Word
Updated June 23, 2023 with more detailed instructions for other sizes and brands.
Imagine you’re organizing a banquet dinner, a wedding, or some kind of formal meeting, and you need to mail merge tent cards with your attendee’s names on them. Ideally you want to be able to print their name on both sides of the card so that it’s easily visible. This is how you do it:
The main trick is to ignore the default template that Word or the Avery website gives you, and to make your own template, sideways 1.
Instructions: Avery 5305 Two-to-a-Page Tent Cards
For the detailed instructions, I’m using the example of two-to-a-page cards like Avery 5305, but there are additional instructions at the end for tent or place cards where you have one, four, or six cards on a page; or for cards from other brands such as St. James Overtures or JAM Paper.
Additional Instructions for Other Sizes:
If you run into any problems during the steps below, make sure to check out the Troubleshooting section for tips that might help.
Set Up
-
Open a new word document and set the layout to Landscape.
-
Set the page margins to 0.5" on the top and sides, and 0" on the bottom. If Word complains about printable area, just select “ignore”.
-
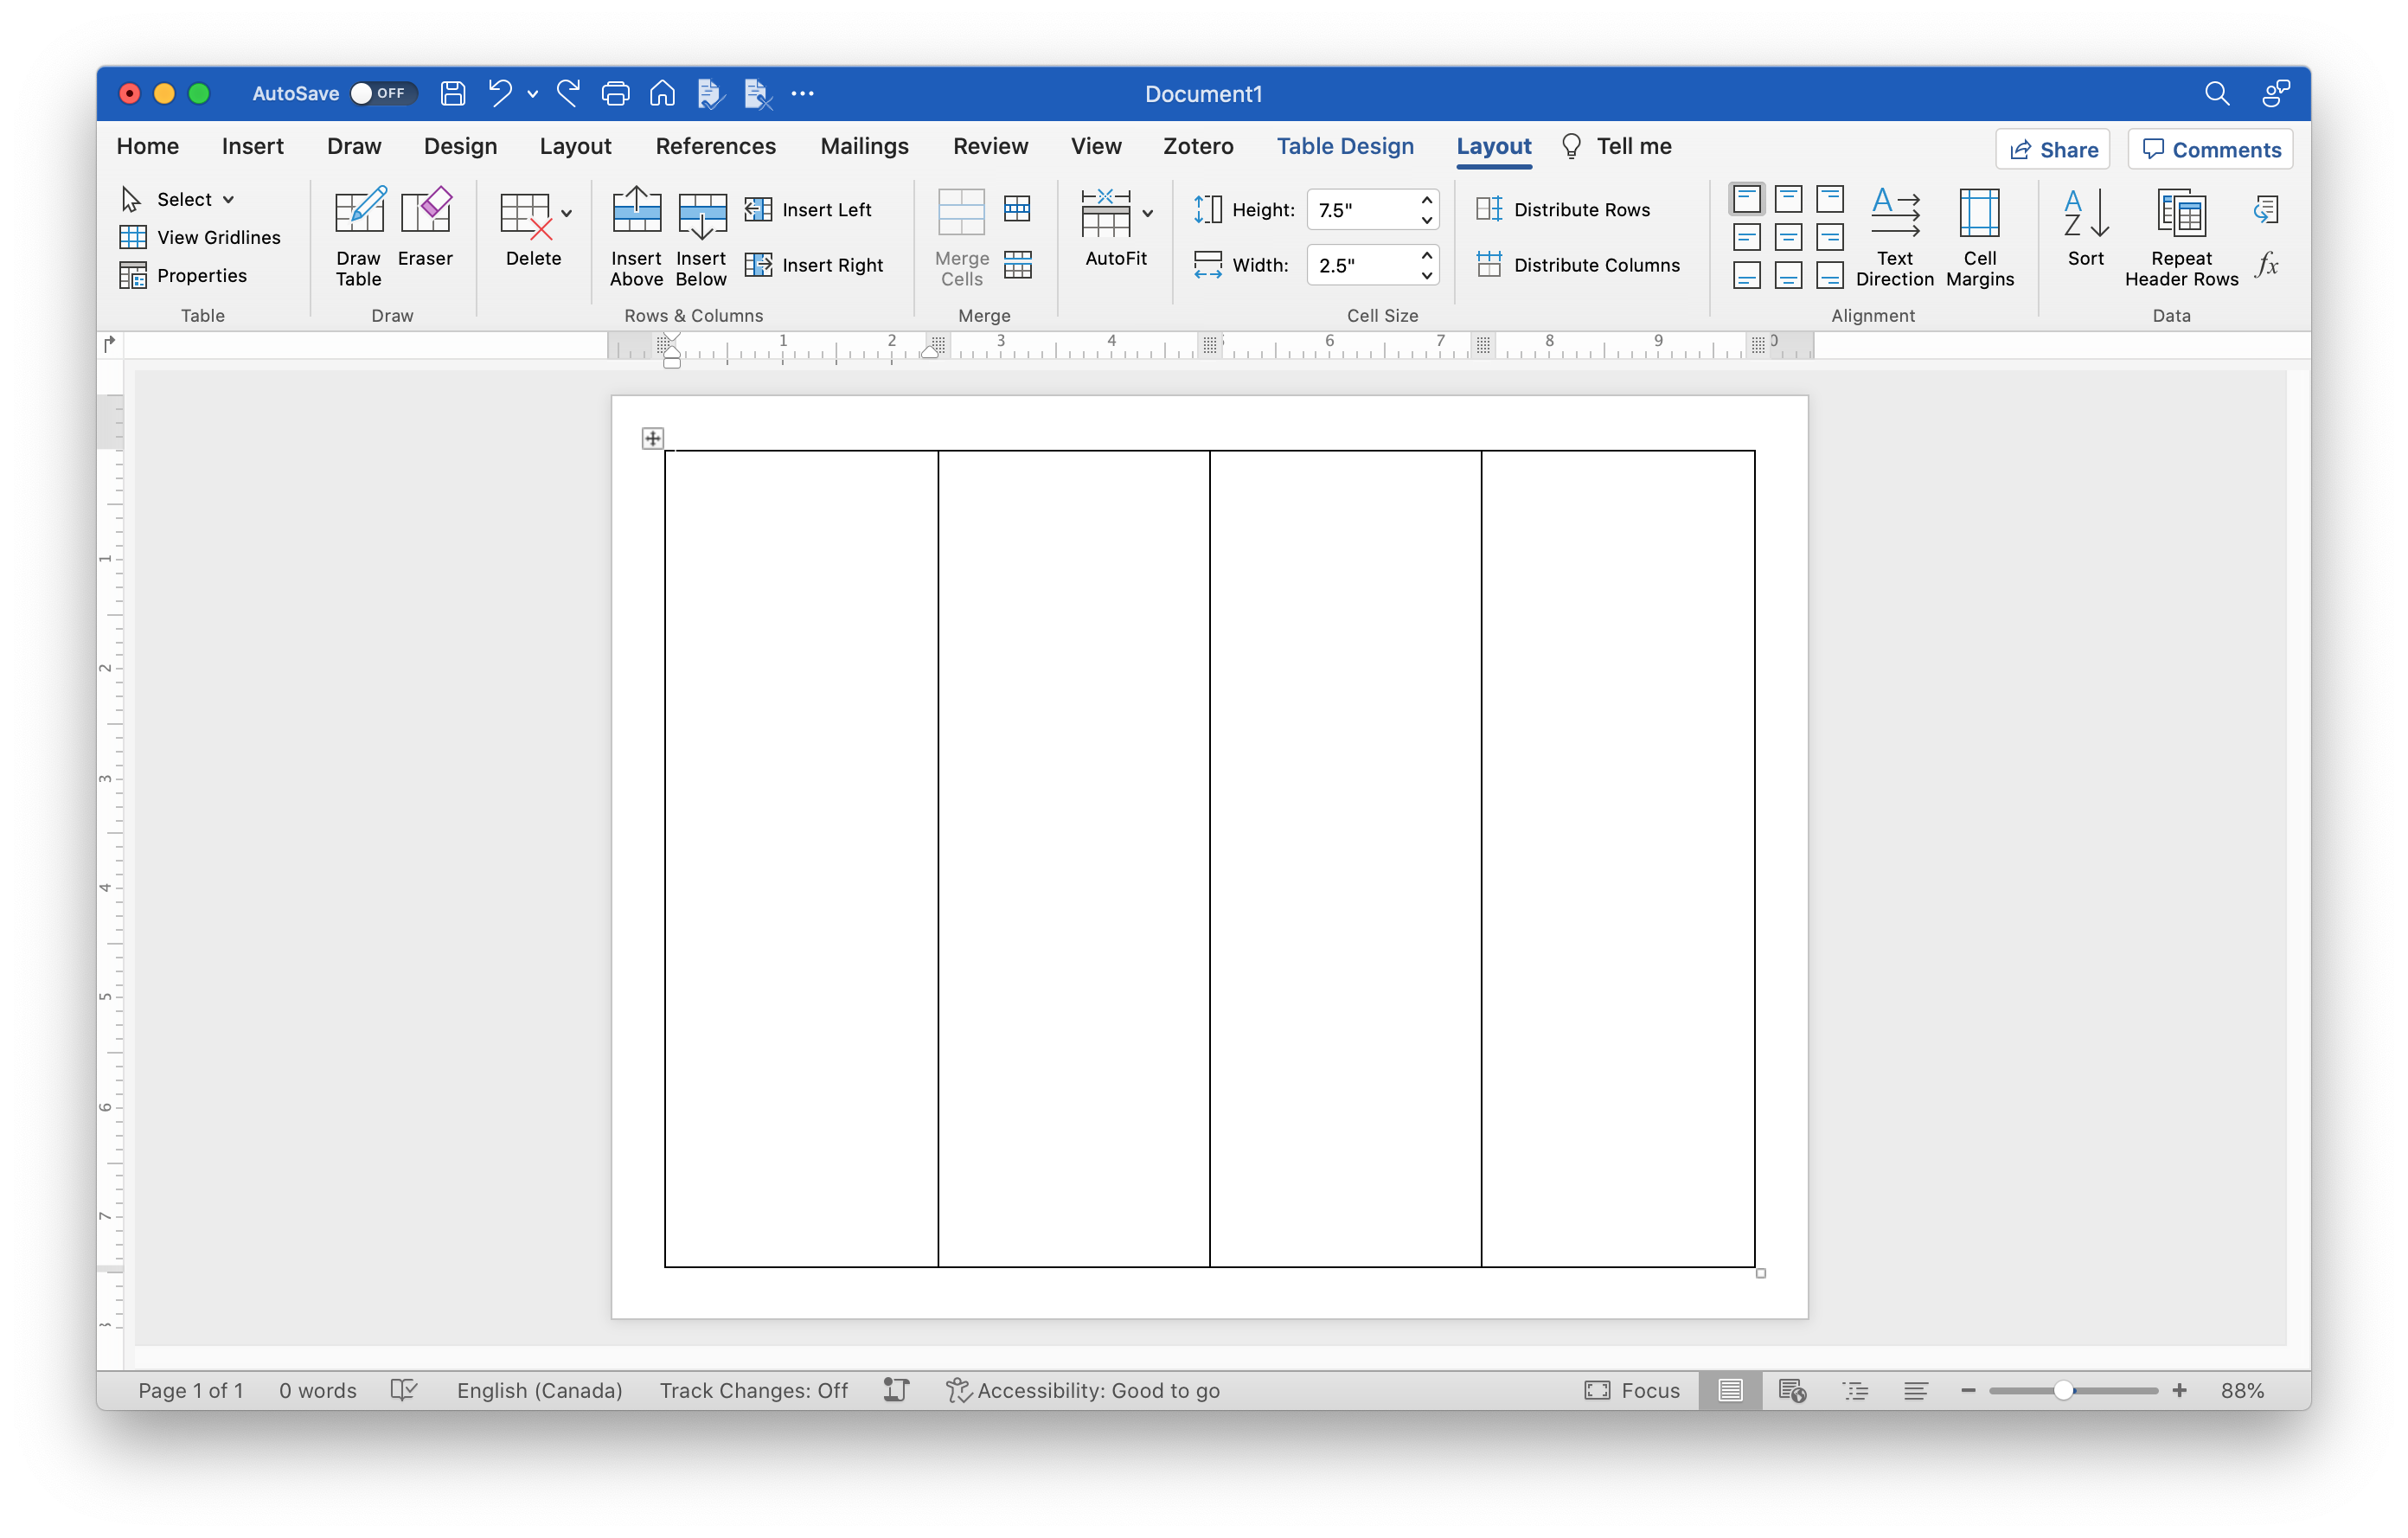
Insert a four-column table and set the cell dimensions to 2.5" wide x 7.5" tall. (You can leave the table borders as-is, we’ll remove them later.)
-
Using the “Mailings” tab, select “Start Mail Merge”, and select “Labels”. Then select “Cancel”. It may seem like you’ve done nothing, but this strange ritual will put Word into the right merge mode and enable the “Update Labels” button.
-
Connect to your data (e.g. a spreadsheet of attendee names) using “Select Recipients”
💡 Tip: Entering Labels Mode
Make sure you select “Start Mail Merge” > “Labels” and not just the “Labels” button right next to “Envelopes”. Even though they both bring you to the same dialog screen, only “Start Mail Merge” > “Labels” puts you into labels mode.
Design
Steps 1–4 can be done in whatever order you find easiest:
-
Using the “Layout” tab, set the alignment for all your table cells to be centred vertically and horizontally.
-
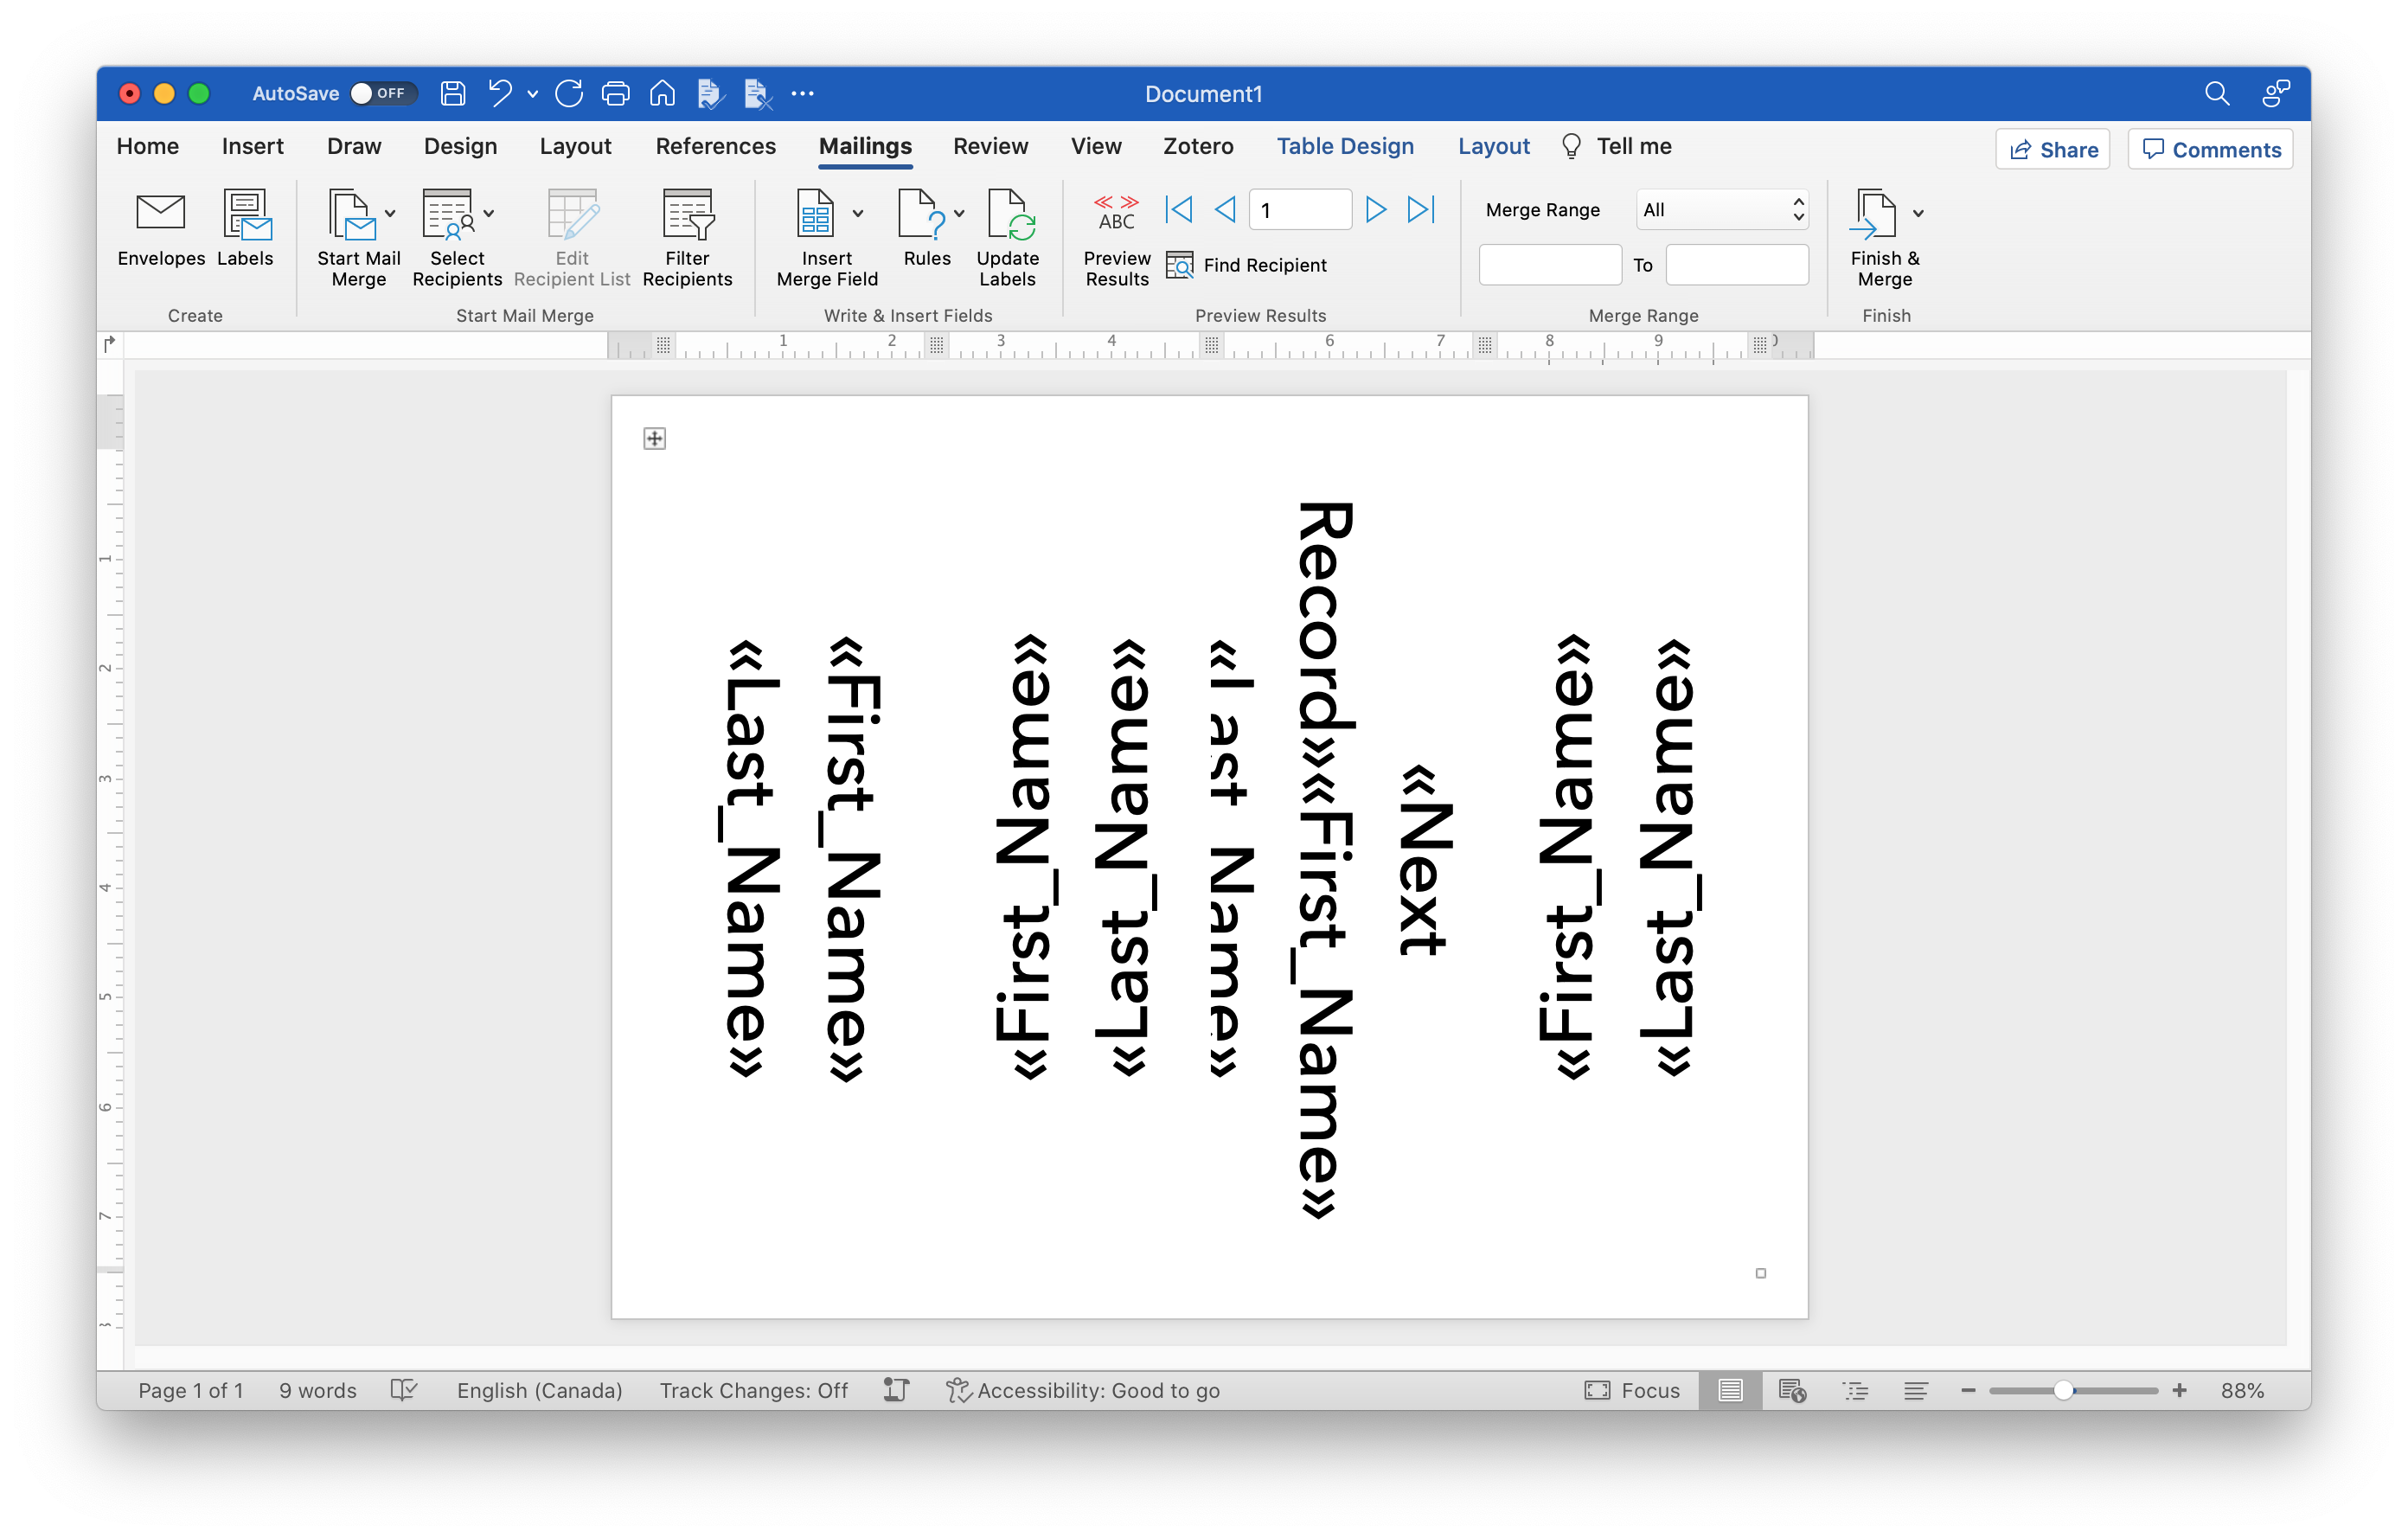
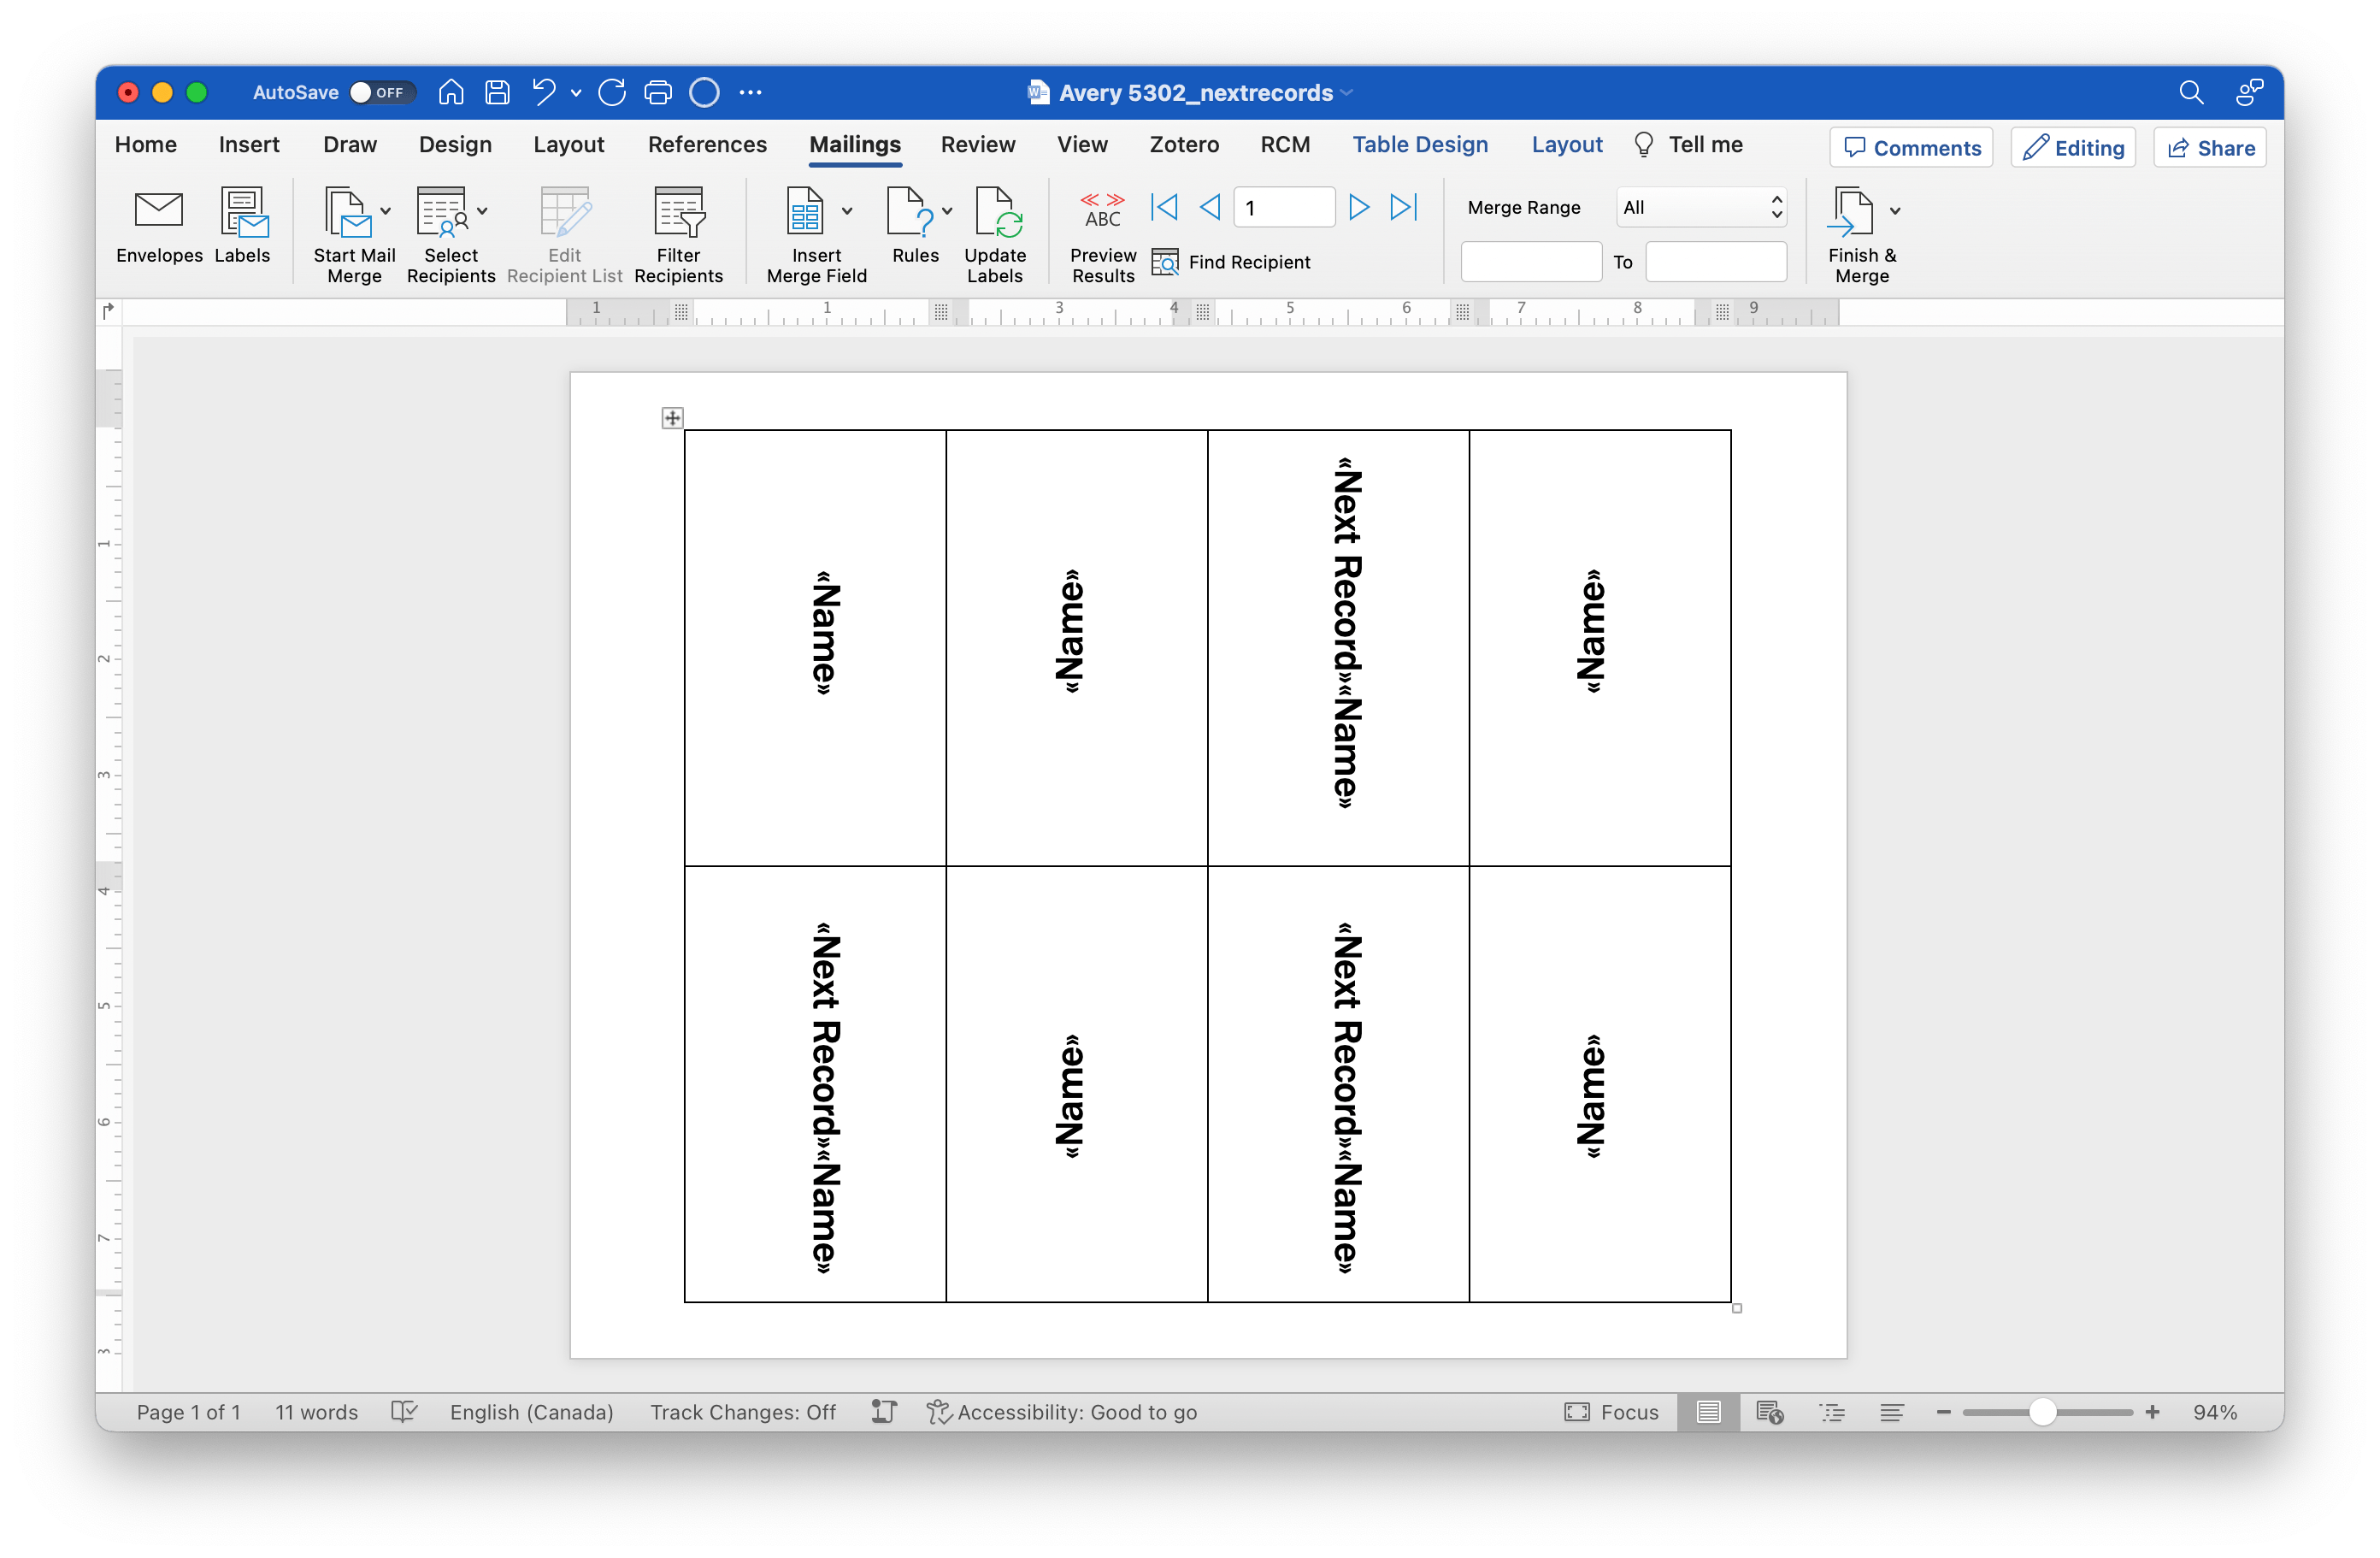
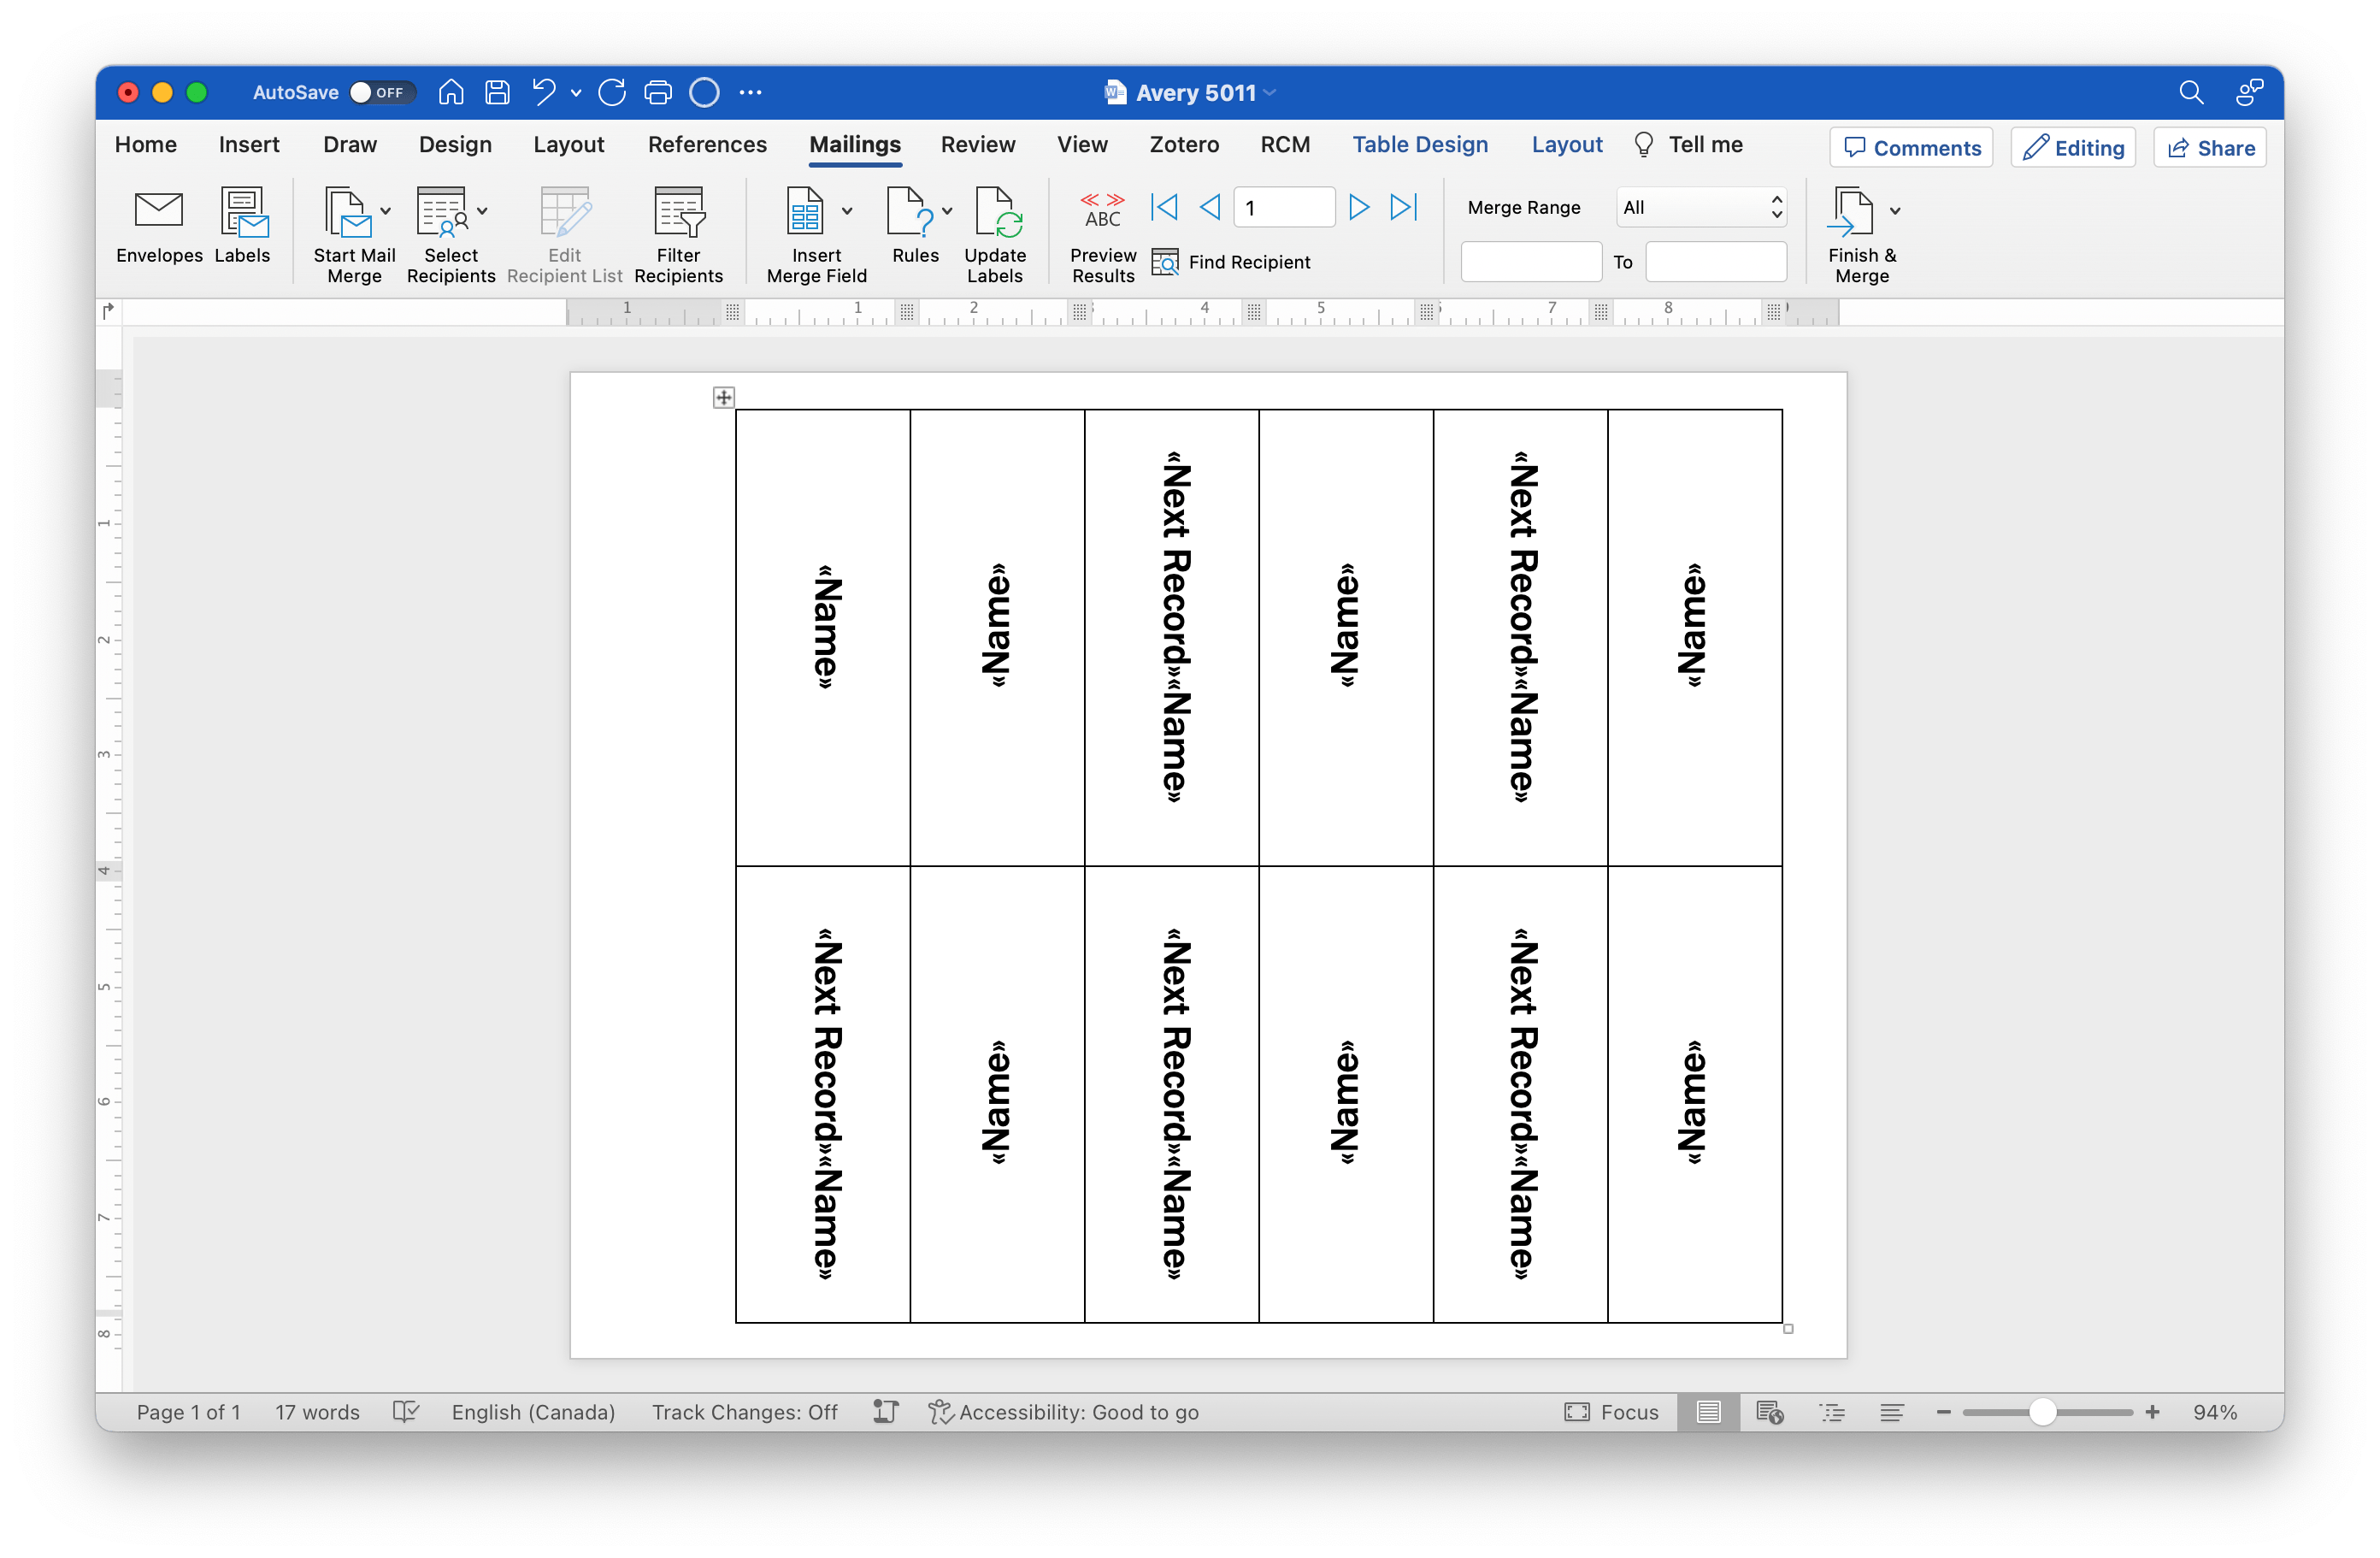
Insert your merge fields in the first column.
-
Using the “Layout” tab, change the text direction so that the text is rotated 90 degrees clockwise in odd columns (e.g. 1 and 3) and counter-clockwise in even columns (e.g. 2 and 4). You might need to type a little bit of text in each column to check.
-
Style your text so that it looks the way you want it (I often will use the “Preview” button on the “Mailings” tab to skip through to the longest name and set the font size based on that.)
-
Using the “Mailings” tab, select “Update Labels”.
-
At this point, it will show a new name in each column — to fix this, delete the
<<Next Record>>merge fields in the even columns (e.g. 2 and 4). You will have to turn off “Preview” if you have that on. -
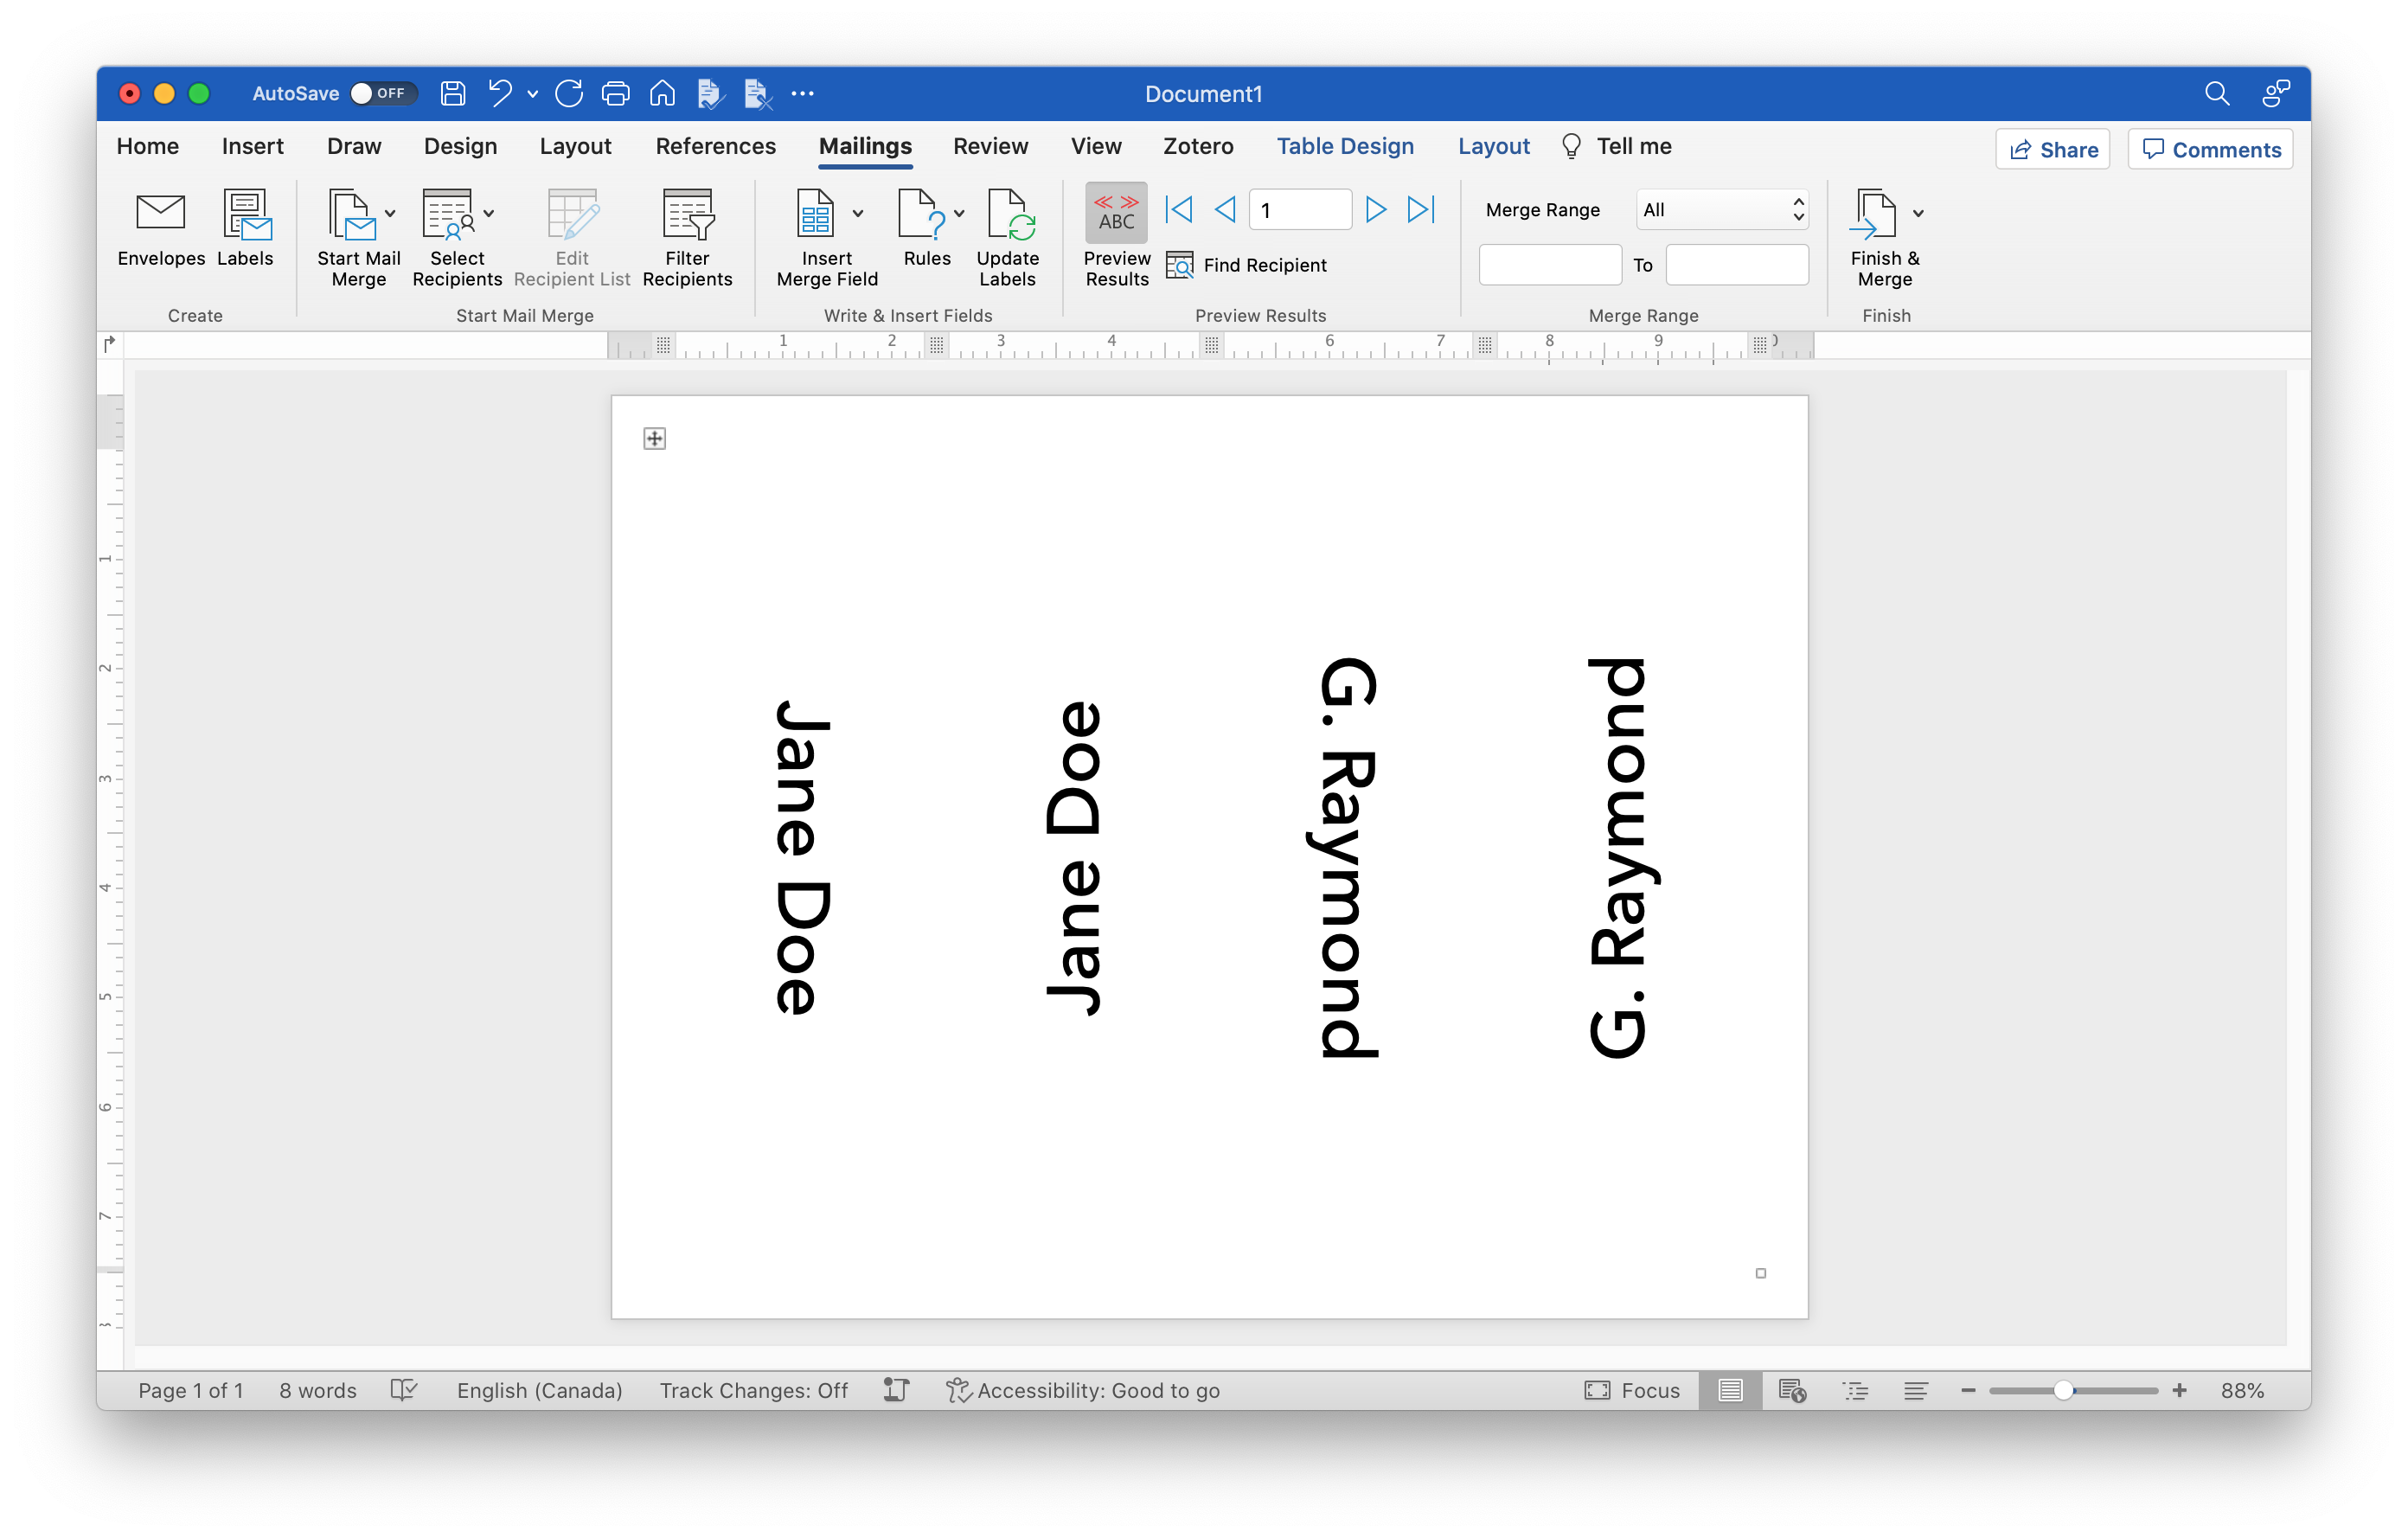
Remove the borders on your table and check that everything looks the way you want it. Make sure to save your file if you haven’t done so already.
💡 Tip: Be Careful With “Update Labels”
Each time you use “Update Labels”, Word will put <<Next Record>> merge fields back into every table cell. To fix this, just remove the <<Next Record>> fields in the even columns again.
💡 Tip: Use Cell Margins For Long Text
If you have text that wraps over more than one line, it’s a good idea to set cell margins for your table so that the text doesn’t run all the way to the edge. You can set cell margins for the whole table by selecting your table and then selecting “Layout” > “Cell Margins” in the ribbon.
The one thing to note is that adding margin at the top or bottom of a cell increases the the table size, so you have to shorten your cell size by the same amount — see the margin offsets section for more information.
Printing
-
Using the “Mailings” tab, select “Finish and Merge” and then “Edit Individual Documents”.
-
Save the newly-generated file and check to make sure that everything merged correctly.
-
At this point, it’s usually a good idea to try printing just one page to make sure you know how to correctly orient your cards in the feed tray. I usually run it through with a piece of paper that has “Top” written on the top of one side so you can figure out the correct rotation.
-
Once you’re confident that everything is set up correctly, print out your cards and have fun separating them and folding them up!
Other Sizes
Avery 5309 (one-to-a-page)
For one-to-a-page cards like Avery 5309, the correct set-up is:
- Set page orientation to portrait;
- Set page margins of 0.5" on the top, 0.75" on the sides, and 0" on the bottom;
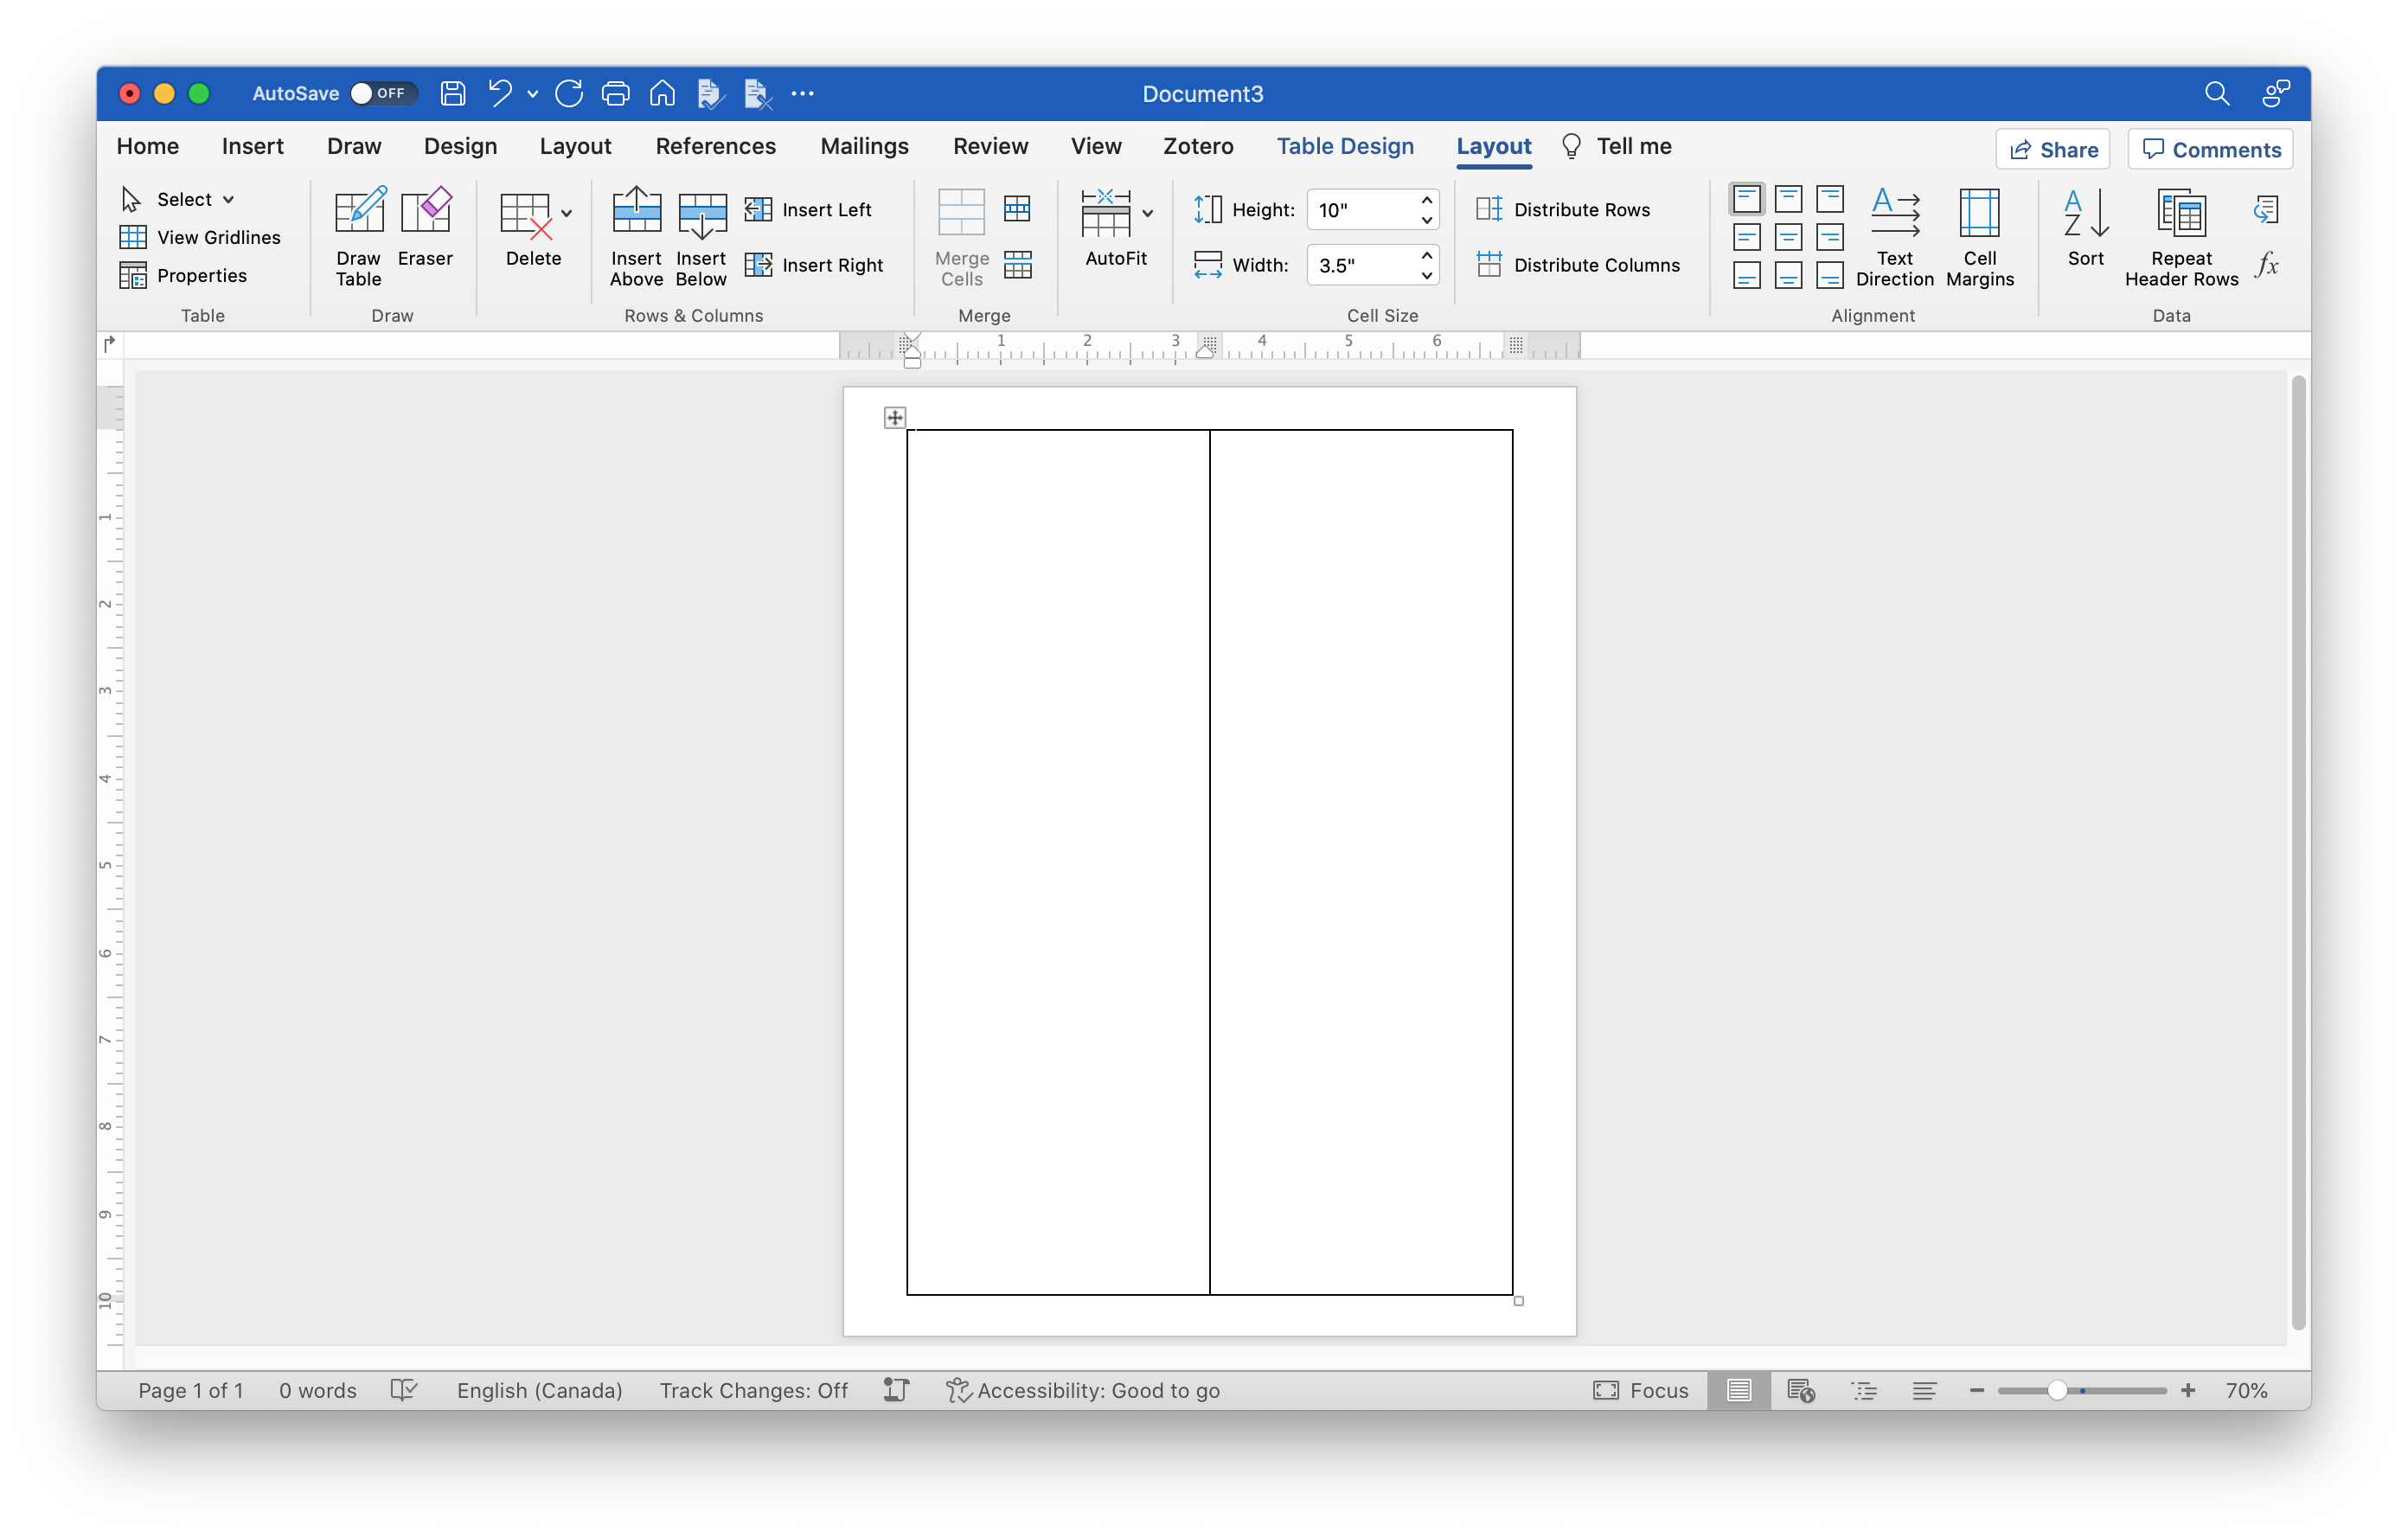
- Insert a 2 col x 1 row table; and
- Set cell size to 10" tall and 3.5" wide.
From here, follow the detailed instructions above, starting with step 4 of Set Up, and make sure to delete the <<Next Record>> tag in column 2.
St. James Overtures Tent Cards (two-to-a-page)
Based on the product information online, St. James Overtures tent cards appear not to have any margin or gutter. However, if you set all page margins to zero, Word will add extra blank pages during the mail merge process, since the invisible Section Break character can’t fit underneath the table.
To make a mail merge file that avoids this blank page problem, we can add 0.25" of space at the top and bottom with the following set-up:
- Set page orientation to landscape;
- Set page margins of 0.25" on the top, 0" on the sides, and 0" on the bottom;
- Insert a 4 col x 1 row table; and
- Set the cell sizes to 8" tall and 2.75" wide.
From here, follow the detailed instructions above, starting with step 4 of Set Up.
Avery 5302 (four-to-a-page)
The set-up for Avery 5302 cards is as follows:
- Set page orientation to landscape;
- Set page margins of 0.5" on the top, 1.0" on the sides, and 0" on the bottom;
- Insert a 4 col x 2 row table; and
- Set cell size to 3.5" tall and 2.25" wide.
You’ll then need to set cell margin offsets as follows:
- Columns 1, 3: Left offset of 0.25"
- Columns 2, 4: Right offset of 0.25"
- Row 1: Bottom offset of 0.25"
- Row 2: Top offset of 0.25"
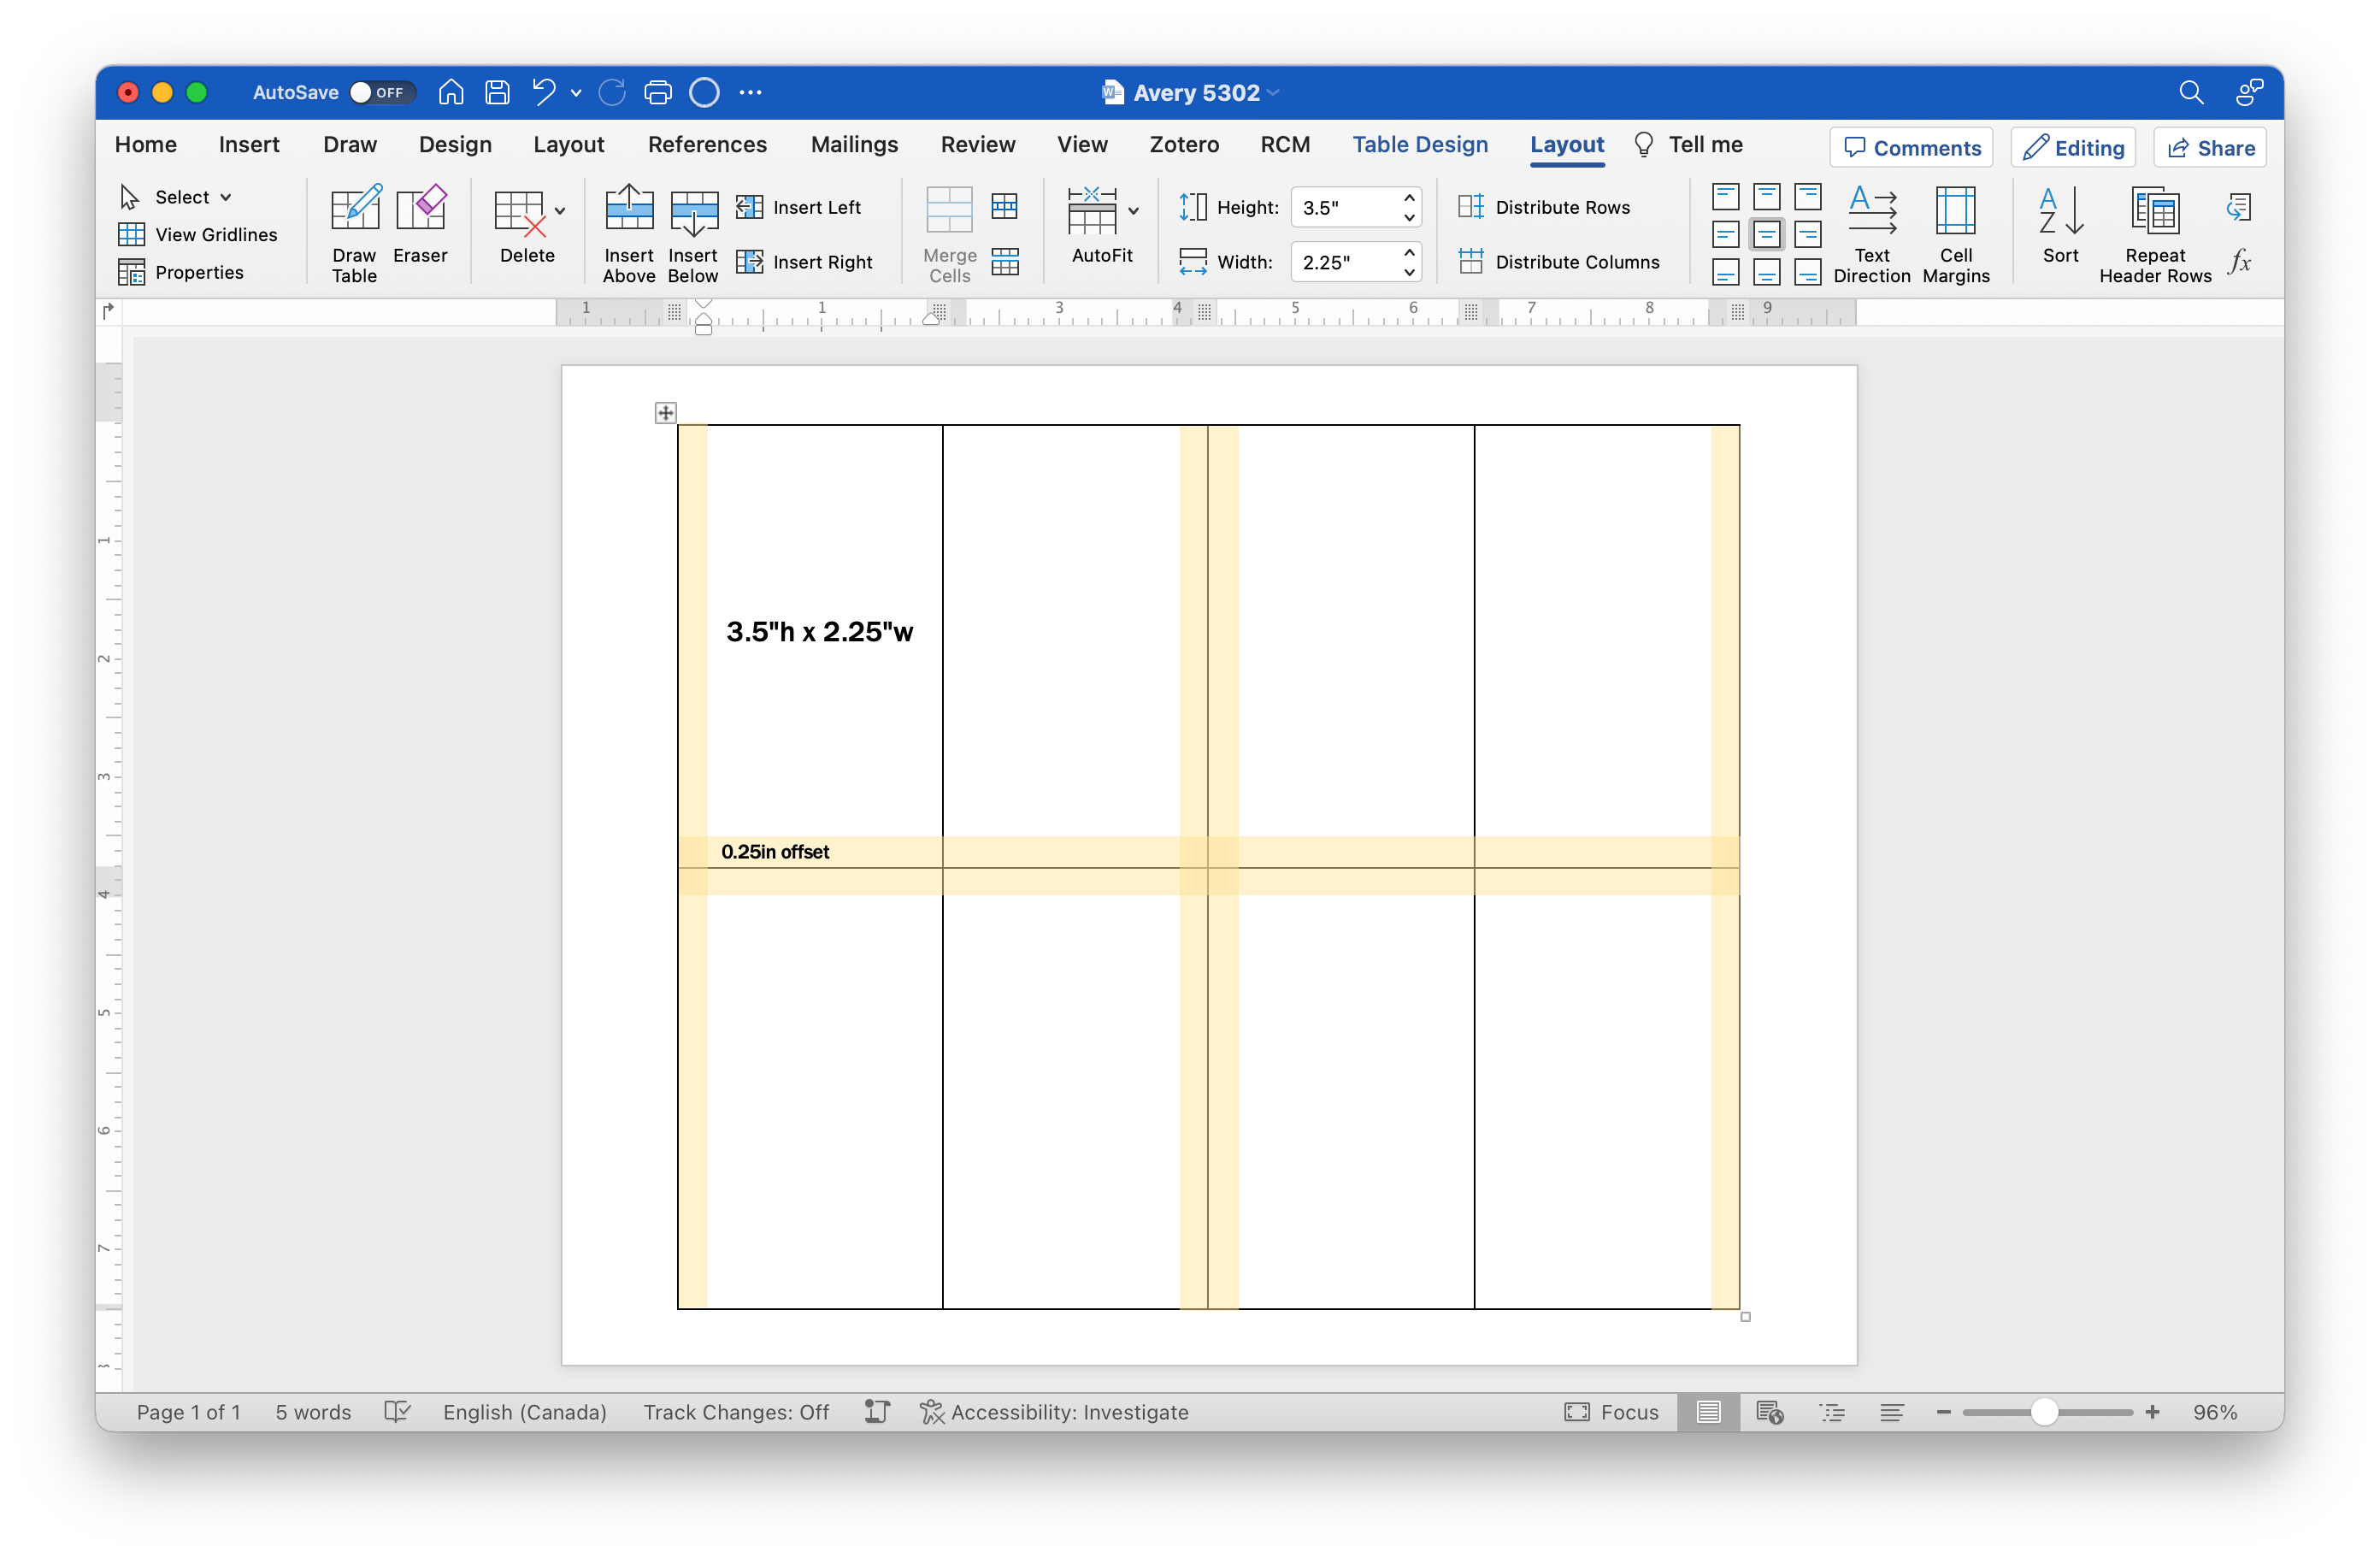
From here, follow the detailed instructions above, starting with step 4 of Set Up.
Avery 5011 (six-to-a-page)
The set-up for Avery 5011 cards is as follows:
- Set page orientation to landscape;
- Set page margins of 0.33" on the top, 1.44" on the left, 0.56" on the right, and 0" on the bottom;
- Insert a 6 col x 2 row table; and
- Set cell size to 3.75" tall and 1.5" wide.
You’ll then need to set cell margin offsets as follows:
- Columns 1, 3, 5: Left offset of 0.07"
- Columns 2, 4, 6: Right offset of 0.07"
- Row 1: Bottom offset of 0.17"
- Row 2: Top offset of 0.17"
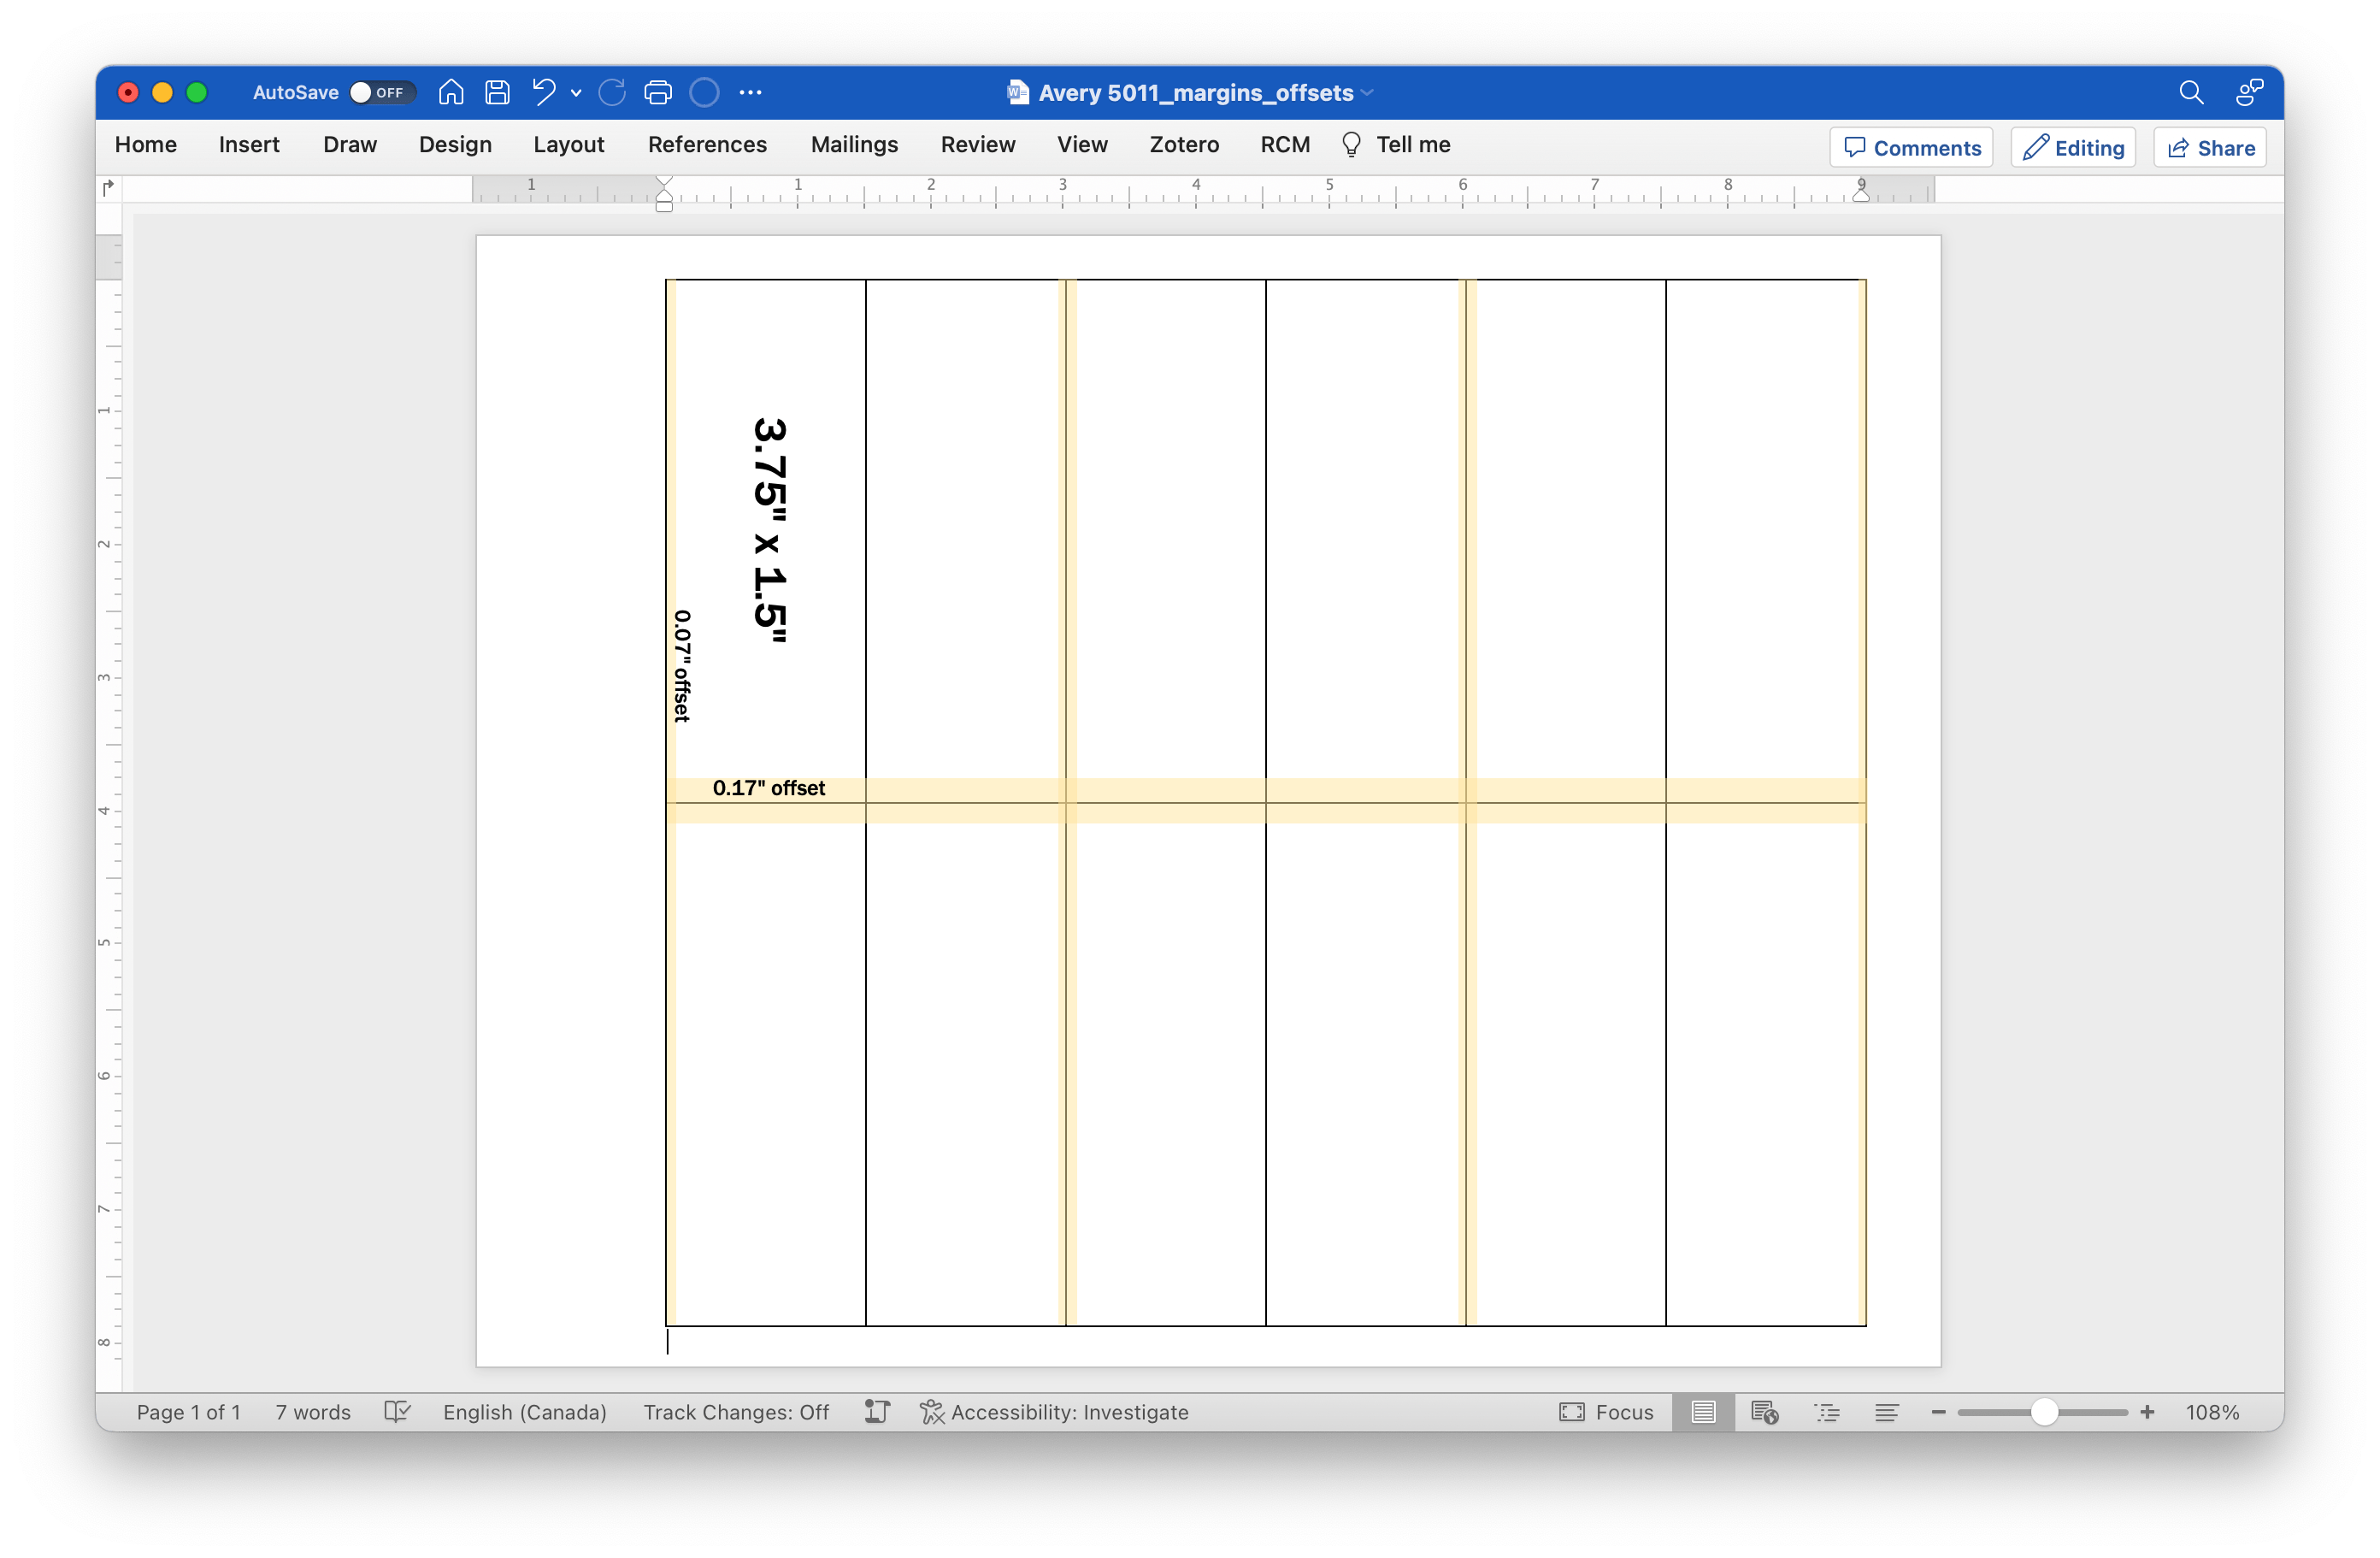
From here, follow the detailed instructions above, starting with step 4 of Set Up.
St. James Overtures place cards (six-to-a-page)
It’s hard for me to see online whether this has margins at the top and bottom (when you’re looking at it in portrait orientation). So you’ll have to check and test if you buy it.
If it does have top/bottom margins (I’m assuming 0.25" based on the advertised dimensions), the set-up is:
- Set page orientation to landscape;
- Set page margins of 0.25" on the top, 0.25" on the sides, and 0" on the bottom;
- Insert a 6 col x 2 row table;
- Set cell size to 3.75" tall and 1.75" wide; and
- Set cell margin offsets as follows: row 1: bottom offset of 0.25"; row 2: top offset of 0.25".
If it doesn’t have any tear-off margins, the set-up is likely as follows with the changes in bold:
- Set page orientation to landscape;
- Set page margins of 0.25" on the top, 0" on the sides, and 0" on the bottom;
- Insert a 6 col x 2 row table;
- Set the cell sizes to 3.75" tall and 1.83" wide; and
- Set cell margin offsets as follows: row 1: bottom offset of 0.25"; row 2: top offset of 0.25".
After figuring out which one is the right set-up, follow the detailed instructions above, starting with step 4 of Set Up.
JAM Paper place cards (six-to-a-page)
The set-up for these cards is as follows:
- Set page orientation to landscape;
- Set page margins of 0.5" on the top, 0.25" on the sides, and 0" on the bottom;
- Insert a 6 col x 2 row table; and
- Set cell size to 3.75" tall and 1.75" wide.
JAM Paper place cards appear to not have a gutter, so no cell margin offsets are needed. However, if you add padding on the top or bottom of table cells, make sure to reduce the cell size by the same amount.
From here, follow the detailed instructions above, starting with step 4 of Set Up.
Setting Cell Margin Offsets
For templates with four or six cards per page, you may have to set specific margins for different rows and columns in your table to account for the gutter (space) between cards.
In Word, you can either set margins at the table level (i.e. the same margins for all cells), or at the cell level (specific margins that might be different from cell to cell). In this case, we want to set the margins at the cell level 2.
To do this, you can set per-cell settings using Word’s “Cell Options” dialog. To get to Cell Options, you can select your desired table cells, right-click, select “Table Properties…”, go to the “Cell” tab, and then select “Options…”. The “Cell Options” dialog will then open; with this menu, you can uncheck Cell margins “Same as the whole table” and then set specific margins for your selected cells only.
💡 Tip: Select Multiple Discontinuous Cells At Once
To select multiple cells that are not next to each other, e.g. cells in both column 1 and column 3 of a table, hold down the ctrl key on Windows or the command key on Mac.
Adding Cell Options To Your Quick Access Toolbar
Since it takes a lot of steps to open the Cell Options dialog, you may want to add it to your Quick Access Toolbar with the following steps:
On Windows, select “File”, then “Options”, then “Quick Access Toolbar”. Using the drop-down at the top-left, select Choose commands from: “Commands Not in the Ribbon”. Find and select “Cell Options…” in the left column, and then select the “Add >>” button in the middle.
On Mac, select “Word”, then “Preferences”. Select “Ribbon & Toolbar” and then choose the “Quick Access Toolbar” tab at the top. Using the drop-down at the top-left, select Choose commands from: “Commands Not in the Ribbon”. Find and select “Table Cell Options” in the left column, and then select the “>” button in the middle.
Select “OK” or “Save” to return to Word, and a circle icon should appear at the very top that opens the “Cell Options” dialog directly.
Calculating Offsets
When adding margin offsets, you will need to add the offset in addition to any cell margin you want to set. You will also have to adjust table row heights to offset any margin you add at the top or bottom of a cell.
I’ll show you how to make these adjustments with two examples using the Avery 5302 (four-to-a-page) template:
Example 1: Offset Margin Only
Follow the first four bullet points in the Avery 5302 instructions to set your page orientation and margins, insert a 4x2 table, and set the cell size. Then select the entire table and set all the margins to zero using Cell Options.
Notice that the margin at the bottom of the page currently appears to be larger than the margin at the top — this is because the cell height of 3.5" intentionally excludes the two 0.25" offsets we will be adding.
To add the row offsets, select row 1 of the table, and then set the bottom margin to 0.25" using Cell Options. Then select row 2 and set its top margin to 0.25". The margins at the top and bottom of the page should now look the same size because Word includes top and bottom cell margins in addition to your cell dimensions.
To add the column offset, hold down ctrl (Windows) or command (Mac) and select columns 1 and 3. Using Cell Options, set the left margin to 0.25". Then select columns 2 and 4, and set their right margin to 0.25". Notice that the width of the table has not changed — this is because Word includes left and right cell margins inside your cell dimensions.
In summary, adding top and bottom cell margins makes your table taller, but adding left and right cell margins does not make your table wider. So you only need to worry about top and bottom margins when calculating the cell sizes you need.
Example 2: Custom and Offset Margins Together
Let’s say that we want to have a margin of 0.1" in our cells in addition to the offsets so that long text doesn’t run all the way to the edge. We can do this as follows:
Like before, follow the first four bullet points in the Avery 5302 instructions to set your page orientation and margins, insert a 4x2 table, and set the cell size. Then select the entire table and this time, set all the margins to 0.1" using Cell Options.
With the custom margins, we’ve now added an additional 0.1" at the top and 0.1" at the bottom, which means we need to make our cells 0.2" shorter to compensate. To do that, select the entire table, and set the cell size to 3.3" tall instead of 3.5".
Now we’re going to add our offsets to the existing margins, so each margin with an offset will be set at 0.35" (0.1" margin + 0.25" offset):
- Columns 1, 3: Left margin of 0.35"
- Columns 2, 4: Right margin of 0.35"
- Row 1: Bottom margin of 0.35"
- Row 2: Top margin of 0.35"
With everything done correctly, the table dimensions should look exactly the same as before.
Troubleshooting
My merged document doesn’t print
I’m not sure how common this issue is, but I’ve run into it occasionally. Try exporting the Word file to PDF and printing from Acrobat.
I updated my spreadsheet but the data doesn’t show up when I preview the merge
If you have updated your spreadsheet but the new data is not showing yet in your preview, make sure your spreadsheet is saved, then save your word file, and close and re-open Word. This will force Word to re-pull the data from the spreadsheet file.
I put in the right dimensions for the table, but after styling my text, the dimensions have changed
Setting Layout > Autofit to “Fixed Column Width” might help, but in most cases, you’ll just have to re-set the table layout to the correct dimensions.
I find the “some margins are outside the printable area of the page” warning annoying
This warning comes up any time you have a page margin set to 0" because most printers can’t print all the way to the edge of a page. However, we usually set our bottom margin 0" to prevent blank pages from being generated when you do your mail merge.
If your template requires you to have 0" page margins on the sides, then there’s no easy way around this warning. If the warning is popping up while you’re trying to print, try exporting to PDF and printing from the PDF instead.
If it’s only your bottom page margin that’s 0", there are a couple alternative options you can try:
Option A: select “fix” when the “outside printable area” warning comes up, and re-open the page margin options to make sure your top, left, and right margins haven’t changed. If you end up with a second blank page after your table, select the blank paragraph on the second page, and set the font size to be really small (e.g. 5pt or 2pt). Once the blank paragraph is small enough, the second blank page should go away.
Option B: Select the blank paragraph on the second page, open the Format > Font dialog, and check “Hidden”. As long as the “Show Invisibles” 3 option isn’t turned on, the second page should go away.
-
The main problem is that while Word can have text oriented 90 degrees sideways in either direction, it can’t orient text upside down. You can make upside down text using a text box, but that doesn’t seem to play well with the mail merge feature. ↩
-
The interaction between table and cell settings can be a bit complicated. Any cell with “Same as the whole table” unchecked becomes completely disconnected from the table-level settings, and table-level left and right margins won’t affect these cells. However, top or bottom margins appear to affect an entire table row, regardless of whether they’re set at the table level, or whether they’re set on just one cell in a row. ↩
-
i.e. the pilcrow button (¶) that shows things like spaces, tab marks, and — relevant to this case — hidden text. ↩