How to migrate from Umami cloud to Umami self-hosted
Updated March 28, 2026 with additional instructions on handling time-shift observed when migrating from Umami Cloud US servers.
Since early 2024, I’ve used the hobby cloud plan for Umami for simple and privacy-friendly web analytics for my personal website, as well as for the BikeSpace project.
It’s a really fantastic tool, but I noticed recently that the hobby plan started only showing me the last six months of data from my site. I’ve had some success starting to self-host some things using Coolify in the last couple of months, so I started working on switching to self-hosted Umami so that I could see (and keep) the full history of my web analytics.
I found a couple guides and resources out there for doing this, but many of them were a little out of date. Here are the steps I took to migrate the analytics for my personal site, including an updated python script for formatting the import data.
Exporting your data from Umami cloud
When I first signed up for the Umami cloud hobby plan, it advertised “1 year data retention”. It looks like they updated this to “6 month data retention” around October 2024. I had actually never noticed either retention period, since it continued to show me my full history up until recently.
Fortunately, when I exported my data, it still had the full history available, so I was able to port everything over to the self-hosted instance and didn’t lose anything.
To download the data for your site(s):
- Log in to Umami cloud
- Select your account in the main menu (top-left “hamburger” icon), then “settings”
- Open the main menu again, and select “data”
- Open “export”, select the site you want to download the data for, and enter the date range to download. If you have more than 12 months of data, you can use the “Custom Range” option.
For actually migrating, we’ll do the data export after we’ve already switched our website to using our self-hosted Umami instance, but if you’re worried your data might be lost, there’s no harm in exporting a copy of the data now.
After requesting the data export, you’ll receive an email with a link to download the data for your site. It will give you a zip file with a random UUID name (will look like some random characters) — to help yourself later, I would suggest re-naming the zipped or un-zipped folder with the name of the site you downloaded and the download date.
Setting up self-hosted Umami
There are many good options for self-hosting Umami, and there are several helpful hosting guides on the Umami docs. As mentioned above, I deployed my instance on Coolify, which was very easy since it’s one of their one-click deploy services.
However you self-host, for the steps below, you will need to make sure that you have SSH and SFTP access for the machine or container that the Umami database is running on.
Once your self-hosted instance is working, go ahead and switch over to using it for your website. When your site is no longer logging its analytics to Umami cloud, we’ll download that data (again) and back-fill the self-hosted database.
Preparing your export files
Follow the export steps noted above to download the data for your site. When I did my exports, it gave me the following files:
website_event.csvincludes data on sessions and pageviews/eventssession_data.csvhas always been blank for me (see note below)event_data.csvincludes event properties
I’m not sure why session_data.csv has been blank for all of the sites I’ve exported, but we can recreate the session database table using website_event.csv, so it’s not really a problem.
For many people, event_data.csv may also be blank, unless you use the “data” argument for tracker functions to log custom data along with certain events.
If you downloaded a copy before, you can check to see if any old data has been lost in the meantime by opening website_event.csv in something like Excel, sorting on the “created_at” column, and comparing the oldest dates in each file.
Once you have your data downloaded, set up a working folder to process it into files that you can import into your self-hosted instance. It helps for the following steps if the folder has a relatively short filepath, e.g. ~/umami_import/ will be easier to use than something like /Users/ben/Library/CloudStorage/OneDrive-Personal/Documents/Programming_Projects/umami_import/.
Into your folder, put your exported files as well as the umami_import.py processing script.
If you’re just migrating one site, you can just put everything in the same folder, like this:
umami_import/
├── umami_import.py
├── website_event.csv
├── session.csv
└── event_data.csv
If you have multiple sites, I would recommend setting up one sub-folder per site:
umami_import/
├── umami_import.py
├── my_website_1/
│   ├── website_event.csv
│   ├── session.csv
│   └── event_data.csv
└── my_website_2/
    ├── website_event.csv
    ├── session.csv
    └── event_data.csv
Processing your export files
In case you didn’t copy umami_import.py into your working folder already, you can find the script file here.
Configuring the script
To generate your import files, open umami_import.py and configure these variables at the top:
# Enter the website ID from your new self-hosted instance
NEW_WEBSITE_ID = ""
# Folder where the export files from your cloud instance are saved
EXPORT_FOLDER = ""
# Folder where you want to save your generated import files
IMPORT_FOLDER = ""
# Optional timezone shift (recommended if migrating from "us" Umami cloud, put None if migrating from "eu" Umami cloud)
SHIFT_TIMEZONE_TO = ZoneInfo("America/New_York")
For NEW_WEBSITE_ID, go to your site in your self-hosted Umami instance, click “edit”, and then the website ID should be the first item listed. Copy it into the script between the quotes next to this variable.
If you are using the “everything in one folder” method, you can leave EXPORT_FOLDER and IMPORT_FOLDER blank and it will both read and save files in the same folder as your script.
If you are using specific folders for each site, put in the name of the folder that you want to process between the quotes next to EXPORT_FOLDER and IMPORT_FOLDER.
If you want to put your generated files in a different folder than your cloud export files, you can do that by specifying different folders for each variable. You don’t need to make the IMPORT_FOLDER in advance; if it doesn’t exist, the script will make it for you.
If you are migrating from the Umami Cloud EU servers, you can put None for SHIFT_TIMEZONE_TO. (None is a built-in python value; you do not need to put it in quotation marks like "None").
If you are migrating from the Umami Cloud US servers, my experience has been that the datetime values are shifted by the difference between Eastern Time and UTC time. I think this is some kind of mis-configuration in how the data is exported from the Umami Cloud US service. To fix it, leave ZoneInfo("America/New_York") as the value for SHIFT_TIMEZONE_TO and the script will correct the timestamps accordingly.
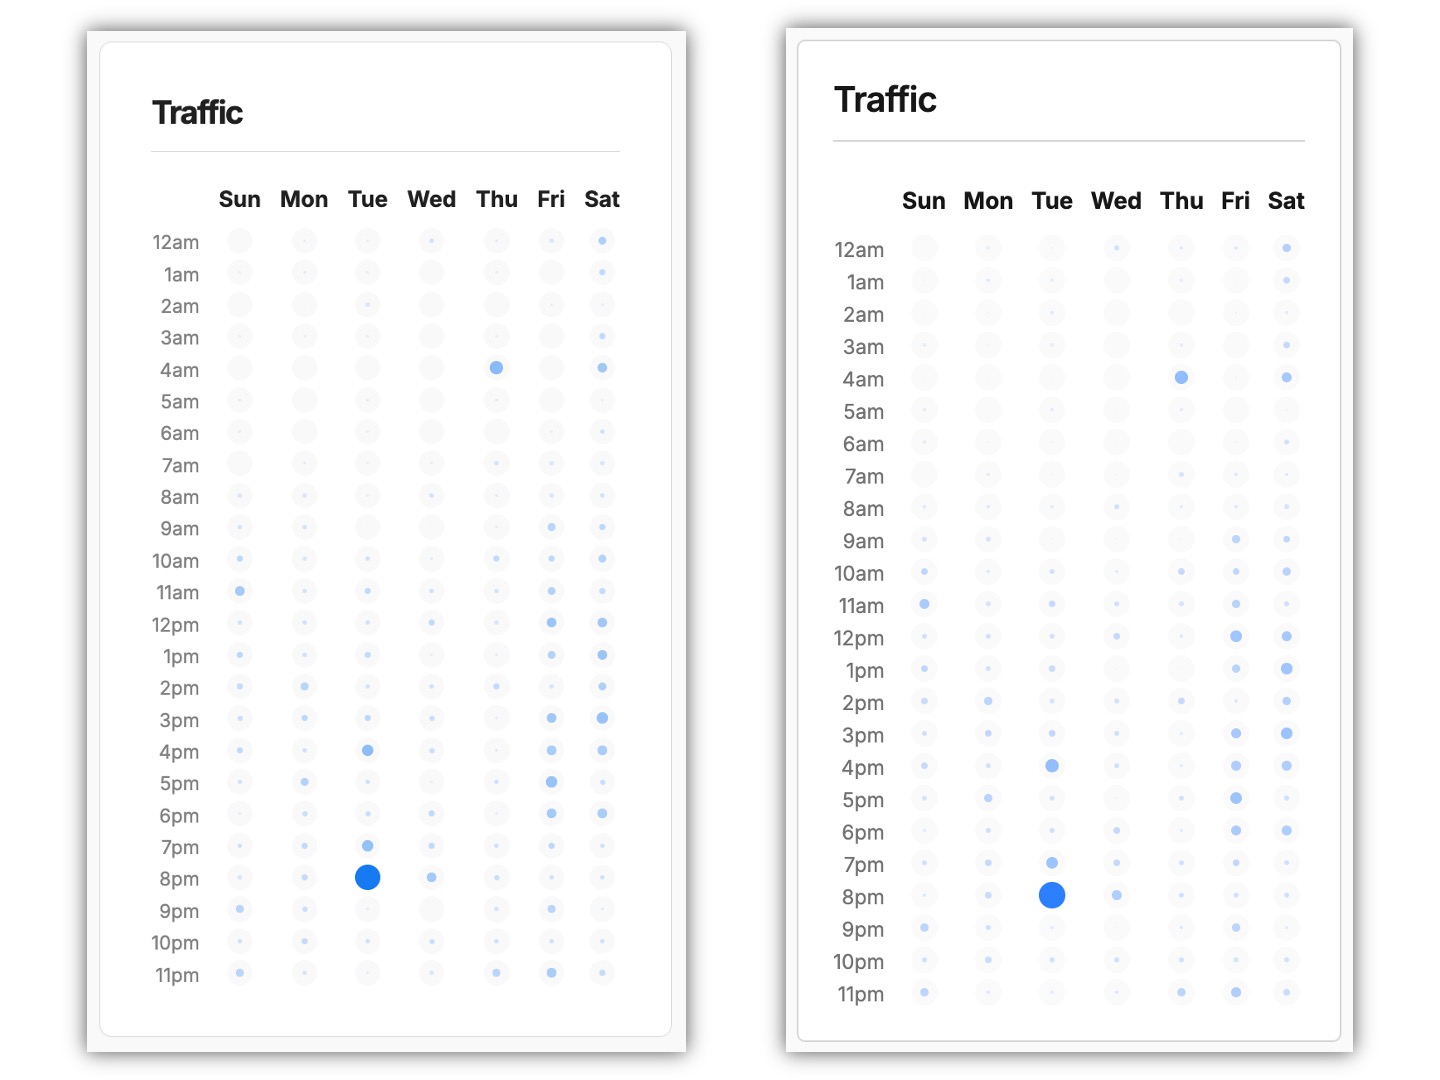
In either case, it can be helpful to find a comparable time period and check the traffic by day and time chart on both your old cloud and new self-hosted dashboards to make sure that the timing data has transferred over correctly. If you see that there is a difference after importing, see the instructions in the second appendix for how to troubleshoot and fix this.
Running the script
To run the script, I would recommend installing uv and then you can run it with:
$ uv run umami_import.py
Other options would include pipx run or just installing pandas (ideally into a virtual environment) and then running python umami_import.py.
Once the script has run, you should have two or three new files:
website_event_new.csvsession_new.csvevent_data_new.csv(only if yourevent_data.csvfile was not blank)
If you run into any issues with running the script, feel free to leave a comment and I’ll see if I can help.
Thank you to this blog post with older instructions on how to migrate and the accompanying github repo for helping me get started on figuring this step out!
Loading the data into your self-hosted instance
The specific steps at this stage might vary depending on how you’ve deployed your self-hosted instance. These are the steps I took for Coolify.
The final database load in this process might be difficult to undo if it goes wrong, so if your method of self-hosting has a backup mechanism, I would recommend doing that first, if you can.
At a high level, Coolify lets you take a server and easily run and manage docker containers on it. When you one-click deploy Umami on Coolify, it will run two containers for you: one for the Umami web app, and one for the database it uses.
To get our old data into our self-hosted Umami instance, we have to:
- Get our import files onto the server that Coolify is running on
- Get the files now on the server into the docker container running the database
- Go into the docker container and use
psqlto load the files into their corresponding database tables
Transferring the files from your computer to the server
To get the files onto the server, I used sftp like this:
# connect to the server using sftp
sftp username@remote_host

# if you need to specify the port
sftp -P 1234 username@remote_host

# copy the files over
# first argument is the name/location on your computer
# second argument is the name/location it should be copied to on the server
put umami_import/session_new.csv session_new.csv
put umami_import/website_event_new.csv website_event_new.csv
put umami_import/event_data_new.csv event_data_new.csv

# end sftp session
exit
Notes:
- In my case, I have public key authentication set up, but if you don’t, it will prompt you to enter your password.
- While in an
sftpsession, commands likels,pwd, andcdwill give you results for the server. If you want to navigate the files on your computer, you can prefix them with ‘l’ for ‘local’, e.g.lls,lpwd, andlcd.
Transferring the files from the server to the docker container
First, ssh into your server:
ssh username@remote_host

# if you need to specify the port
ssh -p 1234 username@remote_host
Then, figure out the id of the docker container that has your umami database in it:
# my default ssh user is not root, so I'm using sudo for docker commands
# the format flag optionally makes things slightly easier to read
sudo docker ps --format "{{.ID}}: {{.Names}}"

# result should include something like this
# find the postgres with the id matching the umami container
e528dc1df8e0:      umami-d6eb7906b6a140f7823e9fb0
e954b58fabd8: postgresql-d6eb7906b6a140f7823e9fb0
Once you have found the container id (in this example case, e954b58fabd8), you can copy the files into the container with docker cp:
sudo docker cp session_new.csv e954b58fabd8:session_new.csv
sudo docker cp website_event_new.csv e954b58fabd8:website_event_new.csv
sudo docker cp event_data_new.csv e954b58fabd8:event_data_new.csv
Loading the files into your database
Now, connect to a shell session inside your docker container:
sudo docker exec -it e954b58fabd8 sh
If you run ls, you should see the files you just copied in. Then you’ll want to start a session with psql (essentially the command line interface for postgres).
To find the username and database name, go into the Coolify configuration page for your Umami instance, select Environment Variables, and find the values for SERVICE_USER_POSTGRES and POSTGRES_DB.
Then you can start your psql session like this:
psql -U $SERVICE_USER_POSTGRES -d $POSTGRES_DB

# e.g. for SERVICE_USER_POSTGRES=93d00085c8d4500b and POSTGRES_DB=umami
psql -U 93d00085c8d4500b -d umami
If you run \dt, you should see the list of database tables, including the session, website_event, and (optional) event_data tables we will backfill:
                   List of relations
 Schema |        Name        | Type  |      Owner
--------+--------------------+-------+------------------
 public | _prisma_migrations | table | 93d00085c8d4500b
 public | event_data         | table | 93d00085c8d4500b
 public | link               | table | 93d00085c8d4500b
 public | pixel              | table | 93d00085c8d4500b
 public | report             | table | 93d00085c8d4500b
 public | revenue            | table | 93d00085c8d4500b
 public | segment            | table | 93d00085c8d4500b
 public | session            | table | 93d00085c8d4500b
 public | session_data       | table | 93d00085c8d4500b
 public | team               | table | 93d00085c8d4500b
 public | team_user          | table | 93d00085c8d4500b
 public | user               | table | 93d00085c8d4500b
 public | website            | table | 93d00085c8d4500b
 public | website_event      | table | 93d00085c8d4500b
Our import files are already named to match the table they need to be imported into. To load them, we’re going to use the \copy command like this:
--  command format
 \copy target_table FROM '/path/to/local/filename.csv' WITH DELIMITER ',' CSV HEADER;

--  for example
\copy session FROM 'session_new.csv' WITH DELIMITER ',' CSV HEADER;
\copy website_event FROM 'website_event_new.csv' WITH DELIMITER ',' CSV HEADER;
\copy event_data FROM 'event_data_new.csv' WITH DELIMITER ',' CSV HEADER;

-- if your import file has 123 rows, successful completion should give you a message like this:
COPY 123
If you didn’t get the expected response or something went wrong, keep reading on and take a look at the appendices, or leave a comment. If everything went smoothly, when you look at your stats on your self-hosted Umami instance, you should see the data from the time period you imported.
After this is done, you’re in an psql session inside a docker container inside your remote server, and probably wondering how to get out:
# exit psql
\q

# exit your docker container
exit

# exit your ssh session - either of these should work
exit
logout
Congratulations! You’ve migrated to self-hosting Umami.
Appendix one: general script troubleshooting
If one or more of your import files didn’t load properly into your database, then there might be a mis-match between the database schema that Umami is using and your import file.
The \copy command expects the following from the input file:
- A properly formatted CSV file with the first row being column headers
- Columns should be in the same order as the database schema
- Columns should match the types expected by the database
- Additional details in the postgres documentation for \copy
To check that the processing script is outputting a file that matches the database schema, you can follow the instructions noted above to get into the container, start a psql session, and try commands like:
-- list tables
\dt

-- describe a table schema
-- this will show you the expected column order and data types
\d TABLE_NAME

-- show some real data from a table (the semicolon at the end is important!)
SELECT * FROM TABLE_NAME;
SELECT * FROM TABLE_NAME LIMIT 5;

-- expanded display will make things easier to read
\x on
\x off

-- this is an sql session, so run whatever queries you find helpful, e.g.
SELECT * FROM event_data ORDER BY created_at DESC LIMIT 3;
If you want to check to make sure the order of the columns in the database tables matches what the script is generating, go to umami_import.py and find the lines commented like this:
# Check in psql with `\d TABLE_NAME`
# Must be in exactly the same order as the table schema
If you’re reading this some amount of time after I wrote it, checking the history of changes to the Umami database schema migration files might also give you some clues as to changes that would require updating the script.
Appendix two: time-shift issues troubleshooting
As noted in the main instructions, when I did my own migrations, I had no issues with the datetimes coming over correctly from the EU Umami Cloud servers, but found that the timestamps from the US Umami Cloud server export were off by the difference between Eastern Time and UTC time.
Here is an example of what that looked like:
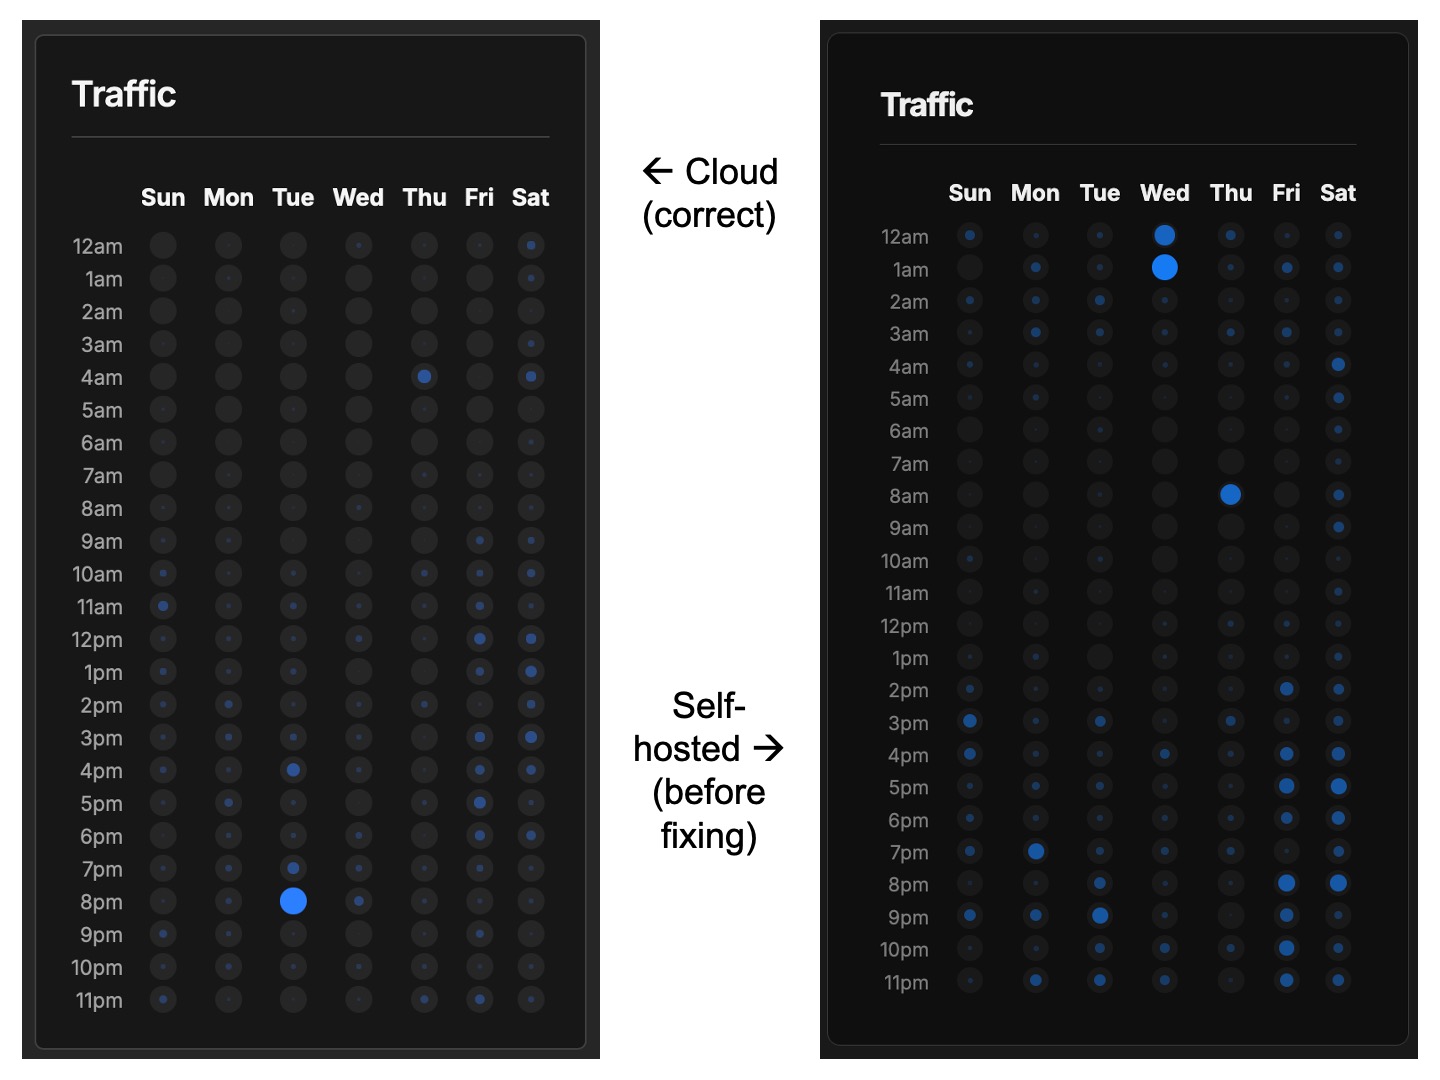
As you can observe, the pattern of dots for each day and hour combination in the right screenshot is noticeably four to five hours ahead of the pattern on the left screenshot. (Other variances in the display are mostly due to the fact that these screenshots were taken from different browsers).
If you notice that you have this issue after your migration, you can observe your own pattern of traffic and check the variance to see if it also lines up with an Eastern Time—UTC difference. If you have a recognizable traffic pattern, you can filter by date to pick a period where both the cloud and self-hosted services have data to display and before new data started being added to your self-hosted instance. If you do not have a recognizable traffic pattern, you could also try narrowing the time period down to one specific day that you can compare across both services.
How to fix this if you’ve done the migration already
Here is a quick overview of the procedure you can follow:
Preparation:
- Do not delete your original script outputs from your first migration. Put them in another sub-folder where you can check them later and where they won’t be over-written by running the script again.
- Figure out how to back up your database, then set up a second self-hosted instance and test restoring your database to it so you know how to do it if needed. (With Coolify, this was easy with the built in database back-up functions, but I had to make sure the configuration I used for the database under “Service Specific Configuration” matched the original instance exactly).
Configure and re-run the data processing script:
- Figure out the amount of time difference that your migrated data is off by (I’m assuming it will be Eastern Time to UTC for you as well, but if not please let me know in a comment on the script gist).
- Set your
SHIFT_TIMEZONE_TOvariable accordingly, run the script again, and check that the correction is in the amount and direction you expect by comparing your new outputs against your older ones. - Once you are satisfied that the script is correctly offsetting for the time-shift error, follow the main instructions above to get the import files into your database environment, but do not load in the new CSV files yet.
Did you take a backup and do a test to make sure you can restore from it? Don’t skip that step! Do it now before you continue!
Delete your old data and load in the corrected data:
- Follow the main instructions to get into your database docker container and start a
psqlsession. - Create and test a query to select the old data to delete by using
SELECT COUNT(*). The number returned should match the number of rows in your old import file exactly. Write down the number of rows you expect to delete and re-add for each database table. - To set a date cut-off to select the old data, you can do a descending sort by
created_atin your old import files and get the top value. - Make sure to also add the website ID to the query in case you have more than one website set up in Umami.
- Once your
SELECT COUNT(*)query exactly matches the number of rows you previously imported, replaceSELECT COUNT(*)withDELETEand run it. - When you run your
DELETEqueries, the number deleted should also match what you expect. If not, something has gone wrong — restore from backup and re-check your steps to figure out why. - From here, follow the main instructions to copy the data from your now-fixed import files into the database.
- Check the traffic by day and hour chart (using a comparable time period) to confirm that it matches the chart in your Umami cloud account.
- Take another backup once you are done with all the data corrections.
Here is an example of what your SELECT and DELETE queries might look like:
-- remember to end each query with a semicolon!

-- select query
SELECT COUNT(*) FROM session
WHERE created_at <= '2026-03-01 19:22:49'
AND website_id = '7a48940d-d606-4e76-8c2f-ab360d3c366d';

-- expected output message format
 count
-------
   123
(1 row)

-- delete query
DELETE FROM session
WHERE created_at <= '2026-03-01 19:22:49'
AND website_id = '7a48940d-d606-4e76-8c2f-ab360d3c366d';

-- expected output message format
DELETE 123
If all goes well, your traffic by day and hour charts from the cloud and self-hosted services (for a comparable time period) should match exactly: